Okay, finally doing a bit of a write-up on how I got these lights in. I'm going to break this down into a few sections, so feel free to skip around to whatever interests you. This was definitely a first prototype for the mounting solution so I didn't go too into detail about what all is needed, but I am hoping to go back in and do it a little better this summer. Please respond here or send me a message if you have questions.
My Personal Requirements
- Reasonable price (<$100 for both)
- LEDs for lower power consumption and because duh it's 2023
- Better light output compared to stock fogs
- Beam pattern doesn't need to be "fog", can be spot or flood light
- Legality wasn't too important as I wasn't going to use them on anything other than empty rural roads
- Decent looking cosmetically
- Plug and play, or at least as close as possible - don't want to modify anything on the car if possible.
- Somewhat decent quality so that it lasts a while, preferably as noted in good reviews.
Lighting choice
I spent a lot of time browsing amazon and thinking about dimensions and sizing to see what would be the closest fit to stock. I ended up going with the following option on Amazon, which costed me $66.88:
https://www.amazon.com (commissions earned)
At first glance, the brand is weird. But the reviews are positive and for the price, I took the gamble.
It's also worth mentioning that these are amber colored, but I believe only based on the lenses. On the same listing page, they have a white 6000K version for...weirdly...$77.99. I would have taken either, but I felt that amber was fine and was cheaper. The two versions seem to be identical other than the lenses, but I can't confirm this for sure.
Initial thoughts and Analysis
My initial impressions were really good. They came packaged well in foam cutouts and with individually bagged mounting hardware. There are connectors included in the box that have bare wire ends so that they can be soldered. Also included were some black plastic covers, which display the only branding on the products. Shown below is what the back looks like - more later.
The lights themselves are quite nice. They are fairly hefty and seem to be fairly well built. My only qualm was that the lenses seem to be made of plastic and don't look like they'd hold up well to rock chips.
As for mounting, I knew the mounts wouldn't be the same and would require modification or some kind of adapter bracket. But I chose them because they were somewhat similar.
I hooked the lights up to my benchtop power supply to measure power draw and compare to the claims on their product description.
At 14v, a single light draws 3.51A, which puts the total power draw right about 49W, which is far off the quoted 80W per light, but is actually right in line with that the stock P5 fogs are spec'ed for. The light seems to be power limited to right about 50W, regardless of what voltage is supplied (up to 24v). This essentially voids any concerns about the stock wiring being insufficient. The lights are very bright so I'm not too concerned with their claims being incorrect.
Install & Wiring
I Initially tried to angle-grind one of the included brackets to get the light to fit, but the mounting hole on the light puts it very low in the hole in the bumper and points it upwards. So I designed a bracket and 3D printed it to test-fit. It uses the stock foglight mounting bracket with the welded nuts.
The bracket is symmetrical and can be printed four times, two for each light. Just print them on their sides and use supports in the holes like is shown above. I think they each took about an hour on my Ender 3.
I installed everything and torqued the bolts down pretty tight. I was worried that the plastic would be too weak and brittle, but I did print it with a 100% infill, and it actually ended up being pretty sturdy.
NOW...I have to provide a disclaimer here. It may or may not be obvious but this bracket has a big issue. I printed it in PLA, which has a fairly low temperature softening point. The plastic bracket is bolted to the metal mount of the light, which also acts as a heatsink and gets warm. So I want to be clear here, this is not a permanent solution. In my application, I don't run these lights for hours on end and I live in a fairly cold climate, so this is only a temporary solution for me, and should probably only be used as a prototyping step for anyone wanting to replicate.
I don't immediately have the resources to get these made out of metal, so I may personally just experiment with high-temp resistant filament. But I'd definitively recommend making something like this out of metal.
As for mounting to the car, after bolting everything together and test-fitting, this is how I angled everything so that the lights were pointed slightly down and were centered. It looks weird but ends up working well. I once again checked that the bolts were torqued very tight, as those two small plastic brackets are small and the light is comparatively heavy. Once installed, the lights were very solidly mounted.
Wiring
As mentioned previously, the kit includes bare end connectors. I wasn't going to keep my old foglights so I snipped the connectors off of them and went ahead and just made some plug-and-play adapters from the stock wiring in the bumper to these lights. This leaves a lot of extra wire length to deal with but keeps everything reversable.
One very odd quirk I found was that for some reason, the polarity of the connectors on the P5 was backwards. So initially, connecting Red-Red, Black-Black did not work. I reversed the polarity and it worked. Don't know why, but if you do this on your P5, probe the connectors in the bumper and make sure you get it right.
Realizing something wasn't right and re-soldering backwards (eww it just looks wrong!)
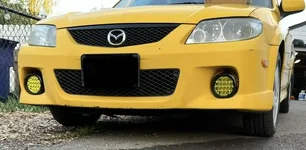
Finished product:
Once installed and plugged in, the lights work as you'd expect the P5 fog lights to operate.
Covers
Small thing, but I put some black matte vinyl over the front of the plastic covers. I keep them on when I am not using the lights to avoid rock chips, and the logos on them look atrocious. My wrap job was not great, but does the job.
Improvements
- I have done the foglight mod on my P5 so I can use them even with the headlights off. If you haven't done this at a minimum, I'd recommend it.
- I am looking into how I might connect the fog lights to the high-beams, with a secondary foglight switch as an enable-disable switch for this feature. In my experience driving with these lights, they are far too bright to drive with others on the road, but it can be challenging to quickly search for and press the foglight button. So being able to use them independently and also with the high-beam switch would be great.
- Proper mounting brackets - the STL download for my part is listed down below, and I can also share it in other forms if desired.
Bracket Mount link:
foglight_bracket.stl
And some other pictures
Sorry these aren't great but I'll try to get more soon. You'll have to trust me when I say these lights are an absolutely phenomenal upgrade for late night (early morning) or very rural drives or even in blizzard white-out conditions.
Side profile. They fit fairly well...not as well as stock but decent. They do sit further forward, but not enough that I personally believe that they look bad.
Edits: requirements, grammar, 3D printer settings


")