I was asking questions about removing the side moldings in this thread:
http://www.mzspd3.com/forum/showthread.php?t=123702826#post3782813
I went and did it today, and it turned out nicely. I followed the directions given in this nice how-to:
http://www.mzspd3.com/forum/showthread.php?t=4737&highlight=remover
I wanted to share some pictures and feedback. I can't do a link to pictures, so they'll all be attached at the bottom of this post, I think.
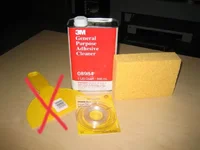
The first picture is of the tools I used. I ended up not using the yellow paint things; you don't need anything like that. I also used a bucket of carwash+water for wiping up before and after (even though I did a wash and wax right after removing the moldings).
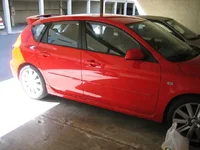
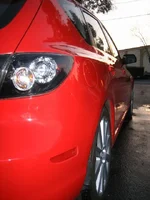
Second picture is a quick snap of the stock MS3 with the side moldings. (This is my first "mod" by the way.) *sniff* The memories...
So I used the sponge and poured a little bit of the solvent over the top crack of the molding. I did this for all four at the same time. I then waited about 3 minutes before starting. I wouldn't recommend waiting less than that; and it would in fact help a little to wait a bit longer, like maybe ten minutes, but this isn't terribly necessary.
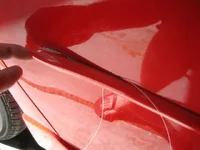
The third picture is of pulling the molding off. I was using clear plastic picture frame wire to sort of "saw" it off.
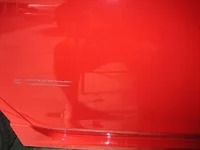
The fourth I wanted to put this picture in to illustrate something: the goop you see on the left is the adhesive that was left over from me "sawing" with the picture frame wire. Where it ends is when I started just pulling it off with my hand. I realized I just needed to "saw" to get it started. To get the adhesive off, I just used my thumbnail (see pic).
The molding is bendy, by the way (pic).
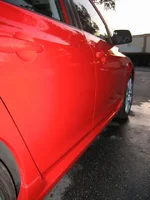
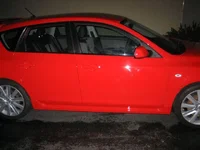
The sun started going down, so I had to hurry up and take pictures with only half the car waxed. The side you can't see is all hazy with unbuffed wax! And I'm also icluding a couple of shots of the side down-low and a couple profile shots.
So, to sum up.... It was not very scary to do. My advice to people who want to do this is definitely get the "3M Adhesive Cleaner". It's about 13 bucks at the hardware, and you know you'll end up using it again on some other project anyway, right? I've read on these forums about other people saying they just used a heat gun or simply pulled it off with no treatment whatsoever. I read the heat gun method made someone's clear coat come off, so please don't try that. I would not recommend just ripping it off without the solvent either, despite reading reports that it worked for other people. And don't forget to wash and wax afterward! (The 3M solution takes off your coat of wax for sure.)
My impressions are that this was quick (took maybe 30 minutes) and makes the car look much nicer; it's very worthwhile. As far as loss of protection the moldings may have afforded, I considered them to be down too low to guard against most common things. I like the way this turned out.
Any questions, just send me a PM, or maybe I'll read this thread now and then!
http://www.mzspd3.com/forum/showthread.php?t=123702826#post3782813
I went and did it today, and it turned out nicely. I followed the directions given in this nice how-to:
http://www.mzspd3.com/forum/showthread.php?t=4737&highlight=remover
I wanted to share some pictures and feedback. I can't do a link to pictures, so they'll all be attached at the bottom of this post, I think.
The first picture is of the tools I used. I ended up not using the yellow paint things; you don't need anything like that. I also used a bucket of carwash+water for wiping up before and after (even though I did a wash and wax right after removing the moldings).
Second picture is a quick snap of the stock MS3 with the side moldings. (This is my first "mod" by the way.) *sniff* The memories...
So I used the sponge and poured a little bit of the solvent over the top crack of the molding. I did this for all four at the same time. I then waited about 3 minutes before starting. I wouldn't recommend waiting less than that; and it would in fact help a little to wait a bit longer, like maybe ten minutes, but this isn't terribly necessary.
The third picture is of pulling the molding off. I was using clear plastic picture frame wire to sort of "saw" it off.
The fourth I wanted to put this picture in to illustrate something: the goop you see on the left is the adhesive that was left over from me "sawing" with the picture frame wire. Where it ends is when I started just pulling it off with my hand. I realized I just needed to "saw" to get it started. To get the adhesive off, I just used my thumbnail (see pic).
The molding is bendy, by the way (pic).
The sun started going down, so I had to hurry up and take pictures with only half the car waxed. The side you can't see is all hazy with unbuffed wax! And I'm also icluding a couple of shots of the side down-low and a couple profile shots.
So, to sum up.... It was not very scary to do. My advice to people who want to do this is definitely get the "3M Adhesive Cleaner". It's about 13 bucks at the hardware, and you know you'll end up using it again on some other project anyway, right? I've read on these forums about other people saying they just used a heat gun or simply pulled it off with no treatment whatsoever. I read the heat gun method made someone's clear coat come off, so please don't try that. I would not recommend just ripping it off without the solvent either, despite reading reports that it worked for other people. And don't forget to wash and wax afterward! (The 3M solution takes off your coat of wax for sure.)
My impressions are that this was quick (took maybe 30 minutes) and makes the car look much nicer; it's very worthwhile. As far as loss of protection the moldings may have afforded, I considered them to be down too low to guard against most common things. I like the way this turned out.
Any questions, just send me a PM, or maybe I'll read this thread now and then!