
You are using an out of date browser. It may not display this or other websites correctly.
You should upgrade or use an alternative browser.
You should upgrade or use an alternative browser.
Anyone replace foglight bulbs on MAZDASPEED3 with higher watt bulbs?
- Thread starter C'ville
- Start date
C'ville said:The stock fog lights seem so dim.
Has anyone changed there bulbs?
I'm curious about this as well.
Subscribed.
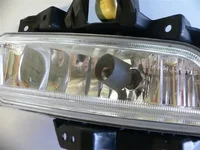
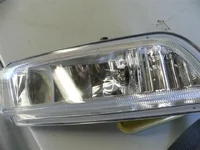
I did some significant mods to my fog lights to make them only kinda useless, up from totally useless. If you look into the lens you can see the bulb is inside a metal shield that blocks 90% of the light - pretty interesting design! I pulled the lights out of the bumper and removed the metal shield. Now, let me say this is not an easy thing to do, but I think it is the only way to get any useful light out of them. If you want to try it, I can describe it more. I also replaced the bulbs with SilverStars and adjusted the aim a bit higher.
Last edited:
Yes please discribe this process a little more.
Also what wattage of bulbs did you get?
Also what wattage of bulbs did you get?
Rotus8 said:I did some significant mods to my fog lights to make them only kinda useless, up from totally useless. If you look into the lens you can see the bulb is inside a metal shield that blocks 90% of the light - pretty interesting design! I pulled the lights out of the bumper and removed the metal shield. Now, let me say this is not an easy thing to do, but I think it is the only way to get any useful light out of them. If you want to try it, I can described it more. I also replaced the bulbs with SilverStars and adjusted the aim a bit higher.
I got Sylvania SilverStar 60 watt 9006 bulbs (the stockers are 55) which is the largest I could find from a major manufacturer in that size.C'ville said:Yes please discribe this process a little more.
Also what wattage of bulbs did you get?
For example, you can get a pair of 9006s for your fogs and 9005s for your high beams from ebay like this:
http://cgi.ebay.com/ebaymotors/ws/eBayISAPI.dll?ViewItem&sspagename=ADME%3AB%3ASS%3AUS%3A1&viewitem=&item=220100940722
Ok, the process is like this:
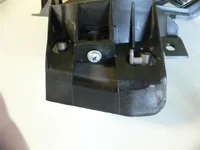
Remove the screws holding the lower corner under-panels on to access the back of the lamps. Unplug the connector and remove the bulb (don't touch the glass). Remove four philips head screws holding the lamp assembly into the bumper and remove the assembly.
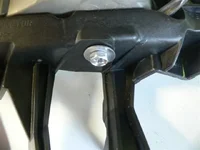
You now have the lamp in a plastic frame. Remove the screw on the bottom of the frame. You can now swivel the lamp in the frame - this is the vertical adjustment. Remove the screws on the ends of the frame and the lamp comes out of the frame.
Now, here's the tricky bit. You need to remove the metal shield from inside the lamp and there are two ways to do it.
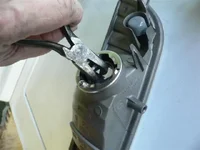
Way #1: Get a pair of needle nose pliers and reach into the hole and start bending the s*** out of the metal shield. It is made out of amazing metal that bends and bends and bends before breaking. You need to keep flexing until it does break, or manages to come out from under the screw holding it. One of mine came out from the screw and the other finally broke. You need to take some care doing this because the reflective material inside the light scratches really easily. A few scratches won't make a big difference but you don't want to make a real mess of it. Once the sheld is loose from the mounting, you have to get it out of the hole. It is helpful to have two pairs of needle nose pliers to bend it into a shape that will fit out of the hole.
Way #2: Take the lamp assemblies (without the plastic frame!) and put them in your oven at 350 degrees for about 10 minutes. This should soften up the adhesive holding the lens onto the reflector. Take out of the oven and pry the reflector and the lens apart. Then remove the screw holding the shield. Then put the two pieces back together and back into the oven to seal it back together again. I have not tried this, but it should work I think.
Anyway, then put the whole thing back together, leaving the screw on the bottom of the frame loose. Then aim by moving this screw back and forth to get the vertical alignment you want. To do the aiming, I waited until after dark, then put a blanket over the headlights so I could see the pattern of the fogs on the wall.
See, I told you it wasn't going to be easy. But I couldn't stand the useless lights. Now at least they do something on a foggy drive in the dark.
Pictures: Light with shield in place before modification. Adjustment screw. Mounting screws. Reaching inside to break the shield. Resulting light without the shield.
Attachments
Last edited:
MadOzodi said:Man, I think Rotus8 should get the DIY Modder of the Year award.
Agree, and whatever question you have, he usually has an answer!!!
We should have a poll on Modder of the Year so far!
M3_Zoom said:Rotus8, Nice! According to the manual, the FOG light bulb is an HB4 which = a 9006 bulb. Did you go with the 9005 on purpose? I just want to clarify before I purchase my bulbs.
$hit you serious? I just sold a pair of silverstars from my eclipse on ebay, they were 9006s, I thought they were H11s but I didnt look in the manual, I just figured I wasnt that lucky

voiceKoil said:$hit you serious? I just sold a pair of silverstars from my eclipse on ebay, they were 9006s, I thought they were H11s but I didnt look in the manual, I just figured I wasnt that lucky
Yes! According to the manual on page 10-7 it shows Fog Lights Type A and Type B. Type A = 55w H11 and Type B = 51w HB4(same as 9006). Now if you turn the page to 10-8 it shows a picture of a Type A Fog Light and Type B Fog Light. Well we (MS3) have the one that looks like the Type B. Type A is a round style Fog Light. The manual could be wrong that's why I was asking about what bulb. I guess the easiest thing is to pull one out and check.
Anyone else replace there Fog Light bulbs?
My bad. The high beams are 9005 and the fogs are 9006. I fixed my post - thanks for the correction.M3_Zoom said:Rotus8, Nice! According to the manual, the FOG light bulb is an HB4 which = a 9006 bulb. Did you go with the 9005 on purpose? I just want to clarify before I purchase my bulbs.
Also, I tried to see if I could put 9005s in it but they don't go in.
Stop, stop! You are embarassing me...MM3Canuck said:Agree, and whatever question you have, he usually has an answer!!!
We should have a poll on Modder of the Year so far!
(Here's a snapshot from my garage )
Attachments
Rotus8 said:My bad. The high beams are 9005 and the fogs are 9006. I fixed my post - thanks for the correction.
Also, I tried to see if I could put 9005s in it but they don't go in.
No, thank you for the clarification. If you came back and said it was a 9005, that's what I would have purchased. We all know manuals do have incorrect information. Again thanks for the clarification and Fog Light bulb 9006 it is. (drinks)
Rotus8 said:Stop, stop! You are embarassing me...
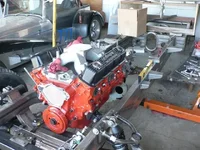
(Here's a snapshot from my garage )
I'll trade you garages. (rockon) What are you building?
That engine and frame are going under a '36 Dodge pickup. Hopefully the first drive will be late this summer.M3_Zoom said:I'll trade you garages. (rockon) What are you building?
Rotus8 said:That engine and frame are going under a '36 Dodge pickup. Hopefully the first drive will be late this summer.
Nice! I recently finished a 67 Chevy Shortbed with a 327 Vette drive-train. Unfortunately someone wanted it more than me. It was stolen from the custom interior shop I had it at. Long story short it was a inside shop job.
I dont want stones thrown at me for "jacking" this thread so best wishes on your truck.(drive2)
Rotus8 said:Stop, stop! You are embarassing me...
(Here's a snapshot from my garage )
Nice! I wish I was mechanically inclined!
Back on topic though, do you find that the fogs are blinding now?
I placing HID in the fogs, and I am afraid that if I take the cover out it will be too bright.
What you guys think?
Having done this mod on mine, I have yet to have anyone flash me, so I guess it must not be too bad. You can adjust the tilt of the lamp so it keeps the beam low. Removing the shield mostly effects the side-to side pattern, the up and down pattern is quite limited by the rectangular shape of the reflector.MM3Canuck said:Nice! I wish I was mechanically inclined!
Back on topic though, do you find that the fogs are blinding now?
I placing HID in the fogs, and I am afraid that if I take the cover out it will be too bright.
What you guys think?
Rotus8 said:Having done this mod on mine, I have yet to have anyone flash me, so I guess it must not be too bad. You can adjust the tilt of the lamp so it keeps the beam low. Removing the shield mostly effects the side-to side pattern, the up and down pattern is quite limited by the rectangular shape of the reflector.
Answered my question! Taking the shield out!!
Thanks Rotus.
Cant believe you did that....
Over the years I have done a lot of research about lights in cars and I got to tell you you had made the biggest mistake ever.
That Metal thing as you call it is a light direction stand. It helps direct the light produced by the bulb to the back of the fog light or any given headlight. What it does concentrates all the light produced by the bult in to one direction which is the mirror finish reflector.
So you removed it and now your bulb is producing light with no direction to go. Just about 20 % of the light now is been reflected to the back of the foglight if not less.
The way to enhance the way a foglight projects more light to the road is to change to a higher lumen bulb, not necessarily watts mean light specially in a car.
What you need is a better bulb with better clarity and the right amount of lumens to immitate the light the sun produces and that way you will see better.
Sorry man, but you messed up the foglights.
Rotus8 said:I got Sylvania SilverStar 60 watt 9006 bulbs (the stockers are 55) which is the largest I could find from a major manufacturer in that size.
For example, you can get a pair of 9006s for your fogs and 9005s for your high beams from ebay like this:
http://cgi.ebay.com/ebaymotors/ws/eBayISAPI.dll?ViewItem&sspagename=ADME%3AB%3ASS%3AUS%3A1&viewitem=&item=220100940722
Ok, the process is like this:
Remove the screws holding the lower corner under-panels on to access the back of the lamps. Unplug the connector and remove the bulb (don't touch the glass). Remove four philips head screws holding the lamp assembly into the bumper and remove the assembly.
You now have the lamp in a plastic frame. Remove the screw on the bottom of the frame. You can now swivel the lamp in the frame - this is the vertical adjustment. Remove the screws on the ends of the frame and the lamp comes out of the frame.
Now, here's the tricky bit. You need to remove the metal shield from inside the lamp and there are two ways to do it.
Way #1: Get a pair of needle nose pliers and reach into the hole and start bending the s*** out of the metal shield. It is made out of amazing metal that bends and bends and bends before breaking. You need to keep flexing until it does break, or manages to come out from under the screw holding it. One of mine came out from the screw and the other finally broke. You need to take some care doing this because the reflective material inside the light scratches really easily. A few scratches won't make a big difference but you don't want to make a real mess of it. Once the sheld is loose from the mounting, you have to get it out of the hole. It is helpful to have two pairs of needle nose pliers to bend it into a shape that will fit out of the hole.
Way #2: Take the lamp assemblies (without the plastic frame!) and put them in your oven at 350 degrees for about 10 minutes. This should soften up the adhesive holding the lens onto the reflector. Take out of the oven and pry the reflector and the lens apart. Then remove the screw holding the shield. Then put the two pieces back together and back into the oven to seal it back together again. I have not tried this, but it should work I think.
Anyway, then put the whole thing back together, leaving the screw on the bottom of the frame loose. Then aim by moving this screw back and forth to get the vertical alignment you want. To do the aiming, I waited until after dark, then put a blanket over the headlights so I could see the pattern of the fogs on the wall.
See, I told you it wasn't going to be easy. But I couldn't stand the useless lights. Now at least they do something on a foggy drive in the dark.
Pictures: Light with shield in place before modification. Adjustment screw. Mounting screws. Reaching inside to break the shield. Resulting light without the shield.
New Posts and Comments

- Replies
- 2K
- Views
- 493K