Pics of P5 Headlights Blacked Out...

LilPixieMama75

Member
Contributor
:
2015 Mazda3 Hatchback...(RIP)'02.5 Vivid Yellow 5-SPD MP5
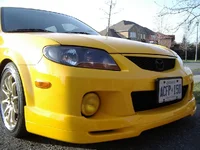
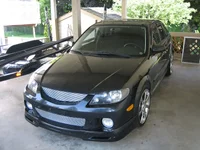
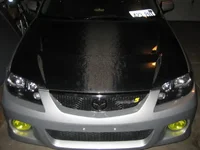
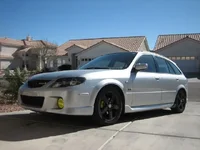
Does anyone have pics of their headlights after they have blacked out the chrome? I have also heard that the headlights on the Canadian version already came blacked out. Is this true? I'd love to see some pics since I am thinking about doing this to my car.

Thanks!
 
digitalricepape said:
look in sig :) there's a how-to about how to do it. not too hard, just takes time.

Ooh! I like the way that looks! I wanna see more pics! I'm going to search for the how-to!
 
Not yellow, but here's a shot.....It's a time consuming mod, but nearly free and really changes the look of the car....I've also seen some yellow and white P5's with the color-matched to the car, which can look nice....
 
Last edited:
ProtoType5 said:
Not yellow, but here's a shot.....It's a time consuming mod, but nearly free and really changes the look of the car....I've also seen some yellow and white P5's with the color-matched to the car, which can look nice....

I just checked out the how-to, where there are a lot of pics posted. I am really liking how it looks. I'm not big on the color matched (no offense to anyone who has done theirs that way...It looks good, but not for me) but I think the black would really look good with the other black details I have. I may have a weekend project! LOL! It's such an inexpensive mod, but does so much for the looks!
 
Go for it, I did it this past April. Took about 6 hours for me, but was well worth it. I wanted to make sure that I was not to have any condensation afterwards, so I sealed everything back up with clear silicone. Worked like a charm.
 

Attachments

  • IMGP2753.webp
    IMGP2753.webp
    79.7 KB · Views: 278
murda79 said:
Go for it, I did it this past April. Took about 6 hours for me, but was well worth it. I wanted to make sure that I was not to have any condensation afterwards, so I sealed everything back up with clear silicone. Worked like a charm.

Nice! (2thumbs)
 
The only advice I can give is be really careful with the tabs that go under the light housing when removing the bumper, and take your time with the sanding and painting....This is where the detail comes in and the pro finish comes out...I've had a lot of complements on the way mine look and a few that think they are Canadian....I spent probably 4 or 5 hours just sanding and painting...3 light coats of primer and 3 light coats of black....Patience....
 
I repainted mine because I have a black pro and thought the chrome stuck out to much.

It is a really easy mod. Once you have the headlights apart the bezel pops right out. I used some fine grit sandpaper and started taking off the chrome. After that I went in with my black paint and started the long process of very thin coats of paint. The reason this mod takes so long is because of the constant spraying and waiting in between to get tacky before you go at it again especially with the amount of curves.

This is a great sitting on the front steps drinking beer waiting for paint to dry mod.
 

Attachments

  • IMG_0448.webp
    IMG_0448.webp
    185.5 KB · Views: 258
Last edited:
ProtoType5 said:
The only advice I can give is be really careful with the tabs that go under the light housing when removing the bumper, and take your time with the sanding and painting....This is where the detail comes in and the pro finish comes out...I've had a lot of complements on the way mine look and a few that think they are Canadian....I spent probably 4 or 5 hours just sanding and painting...3 light coats of primer and 3 light coats of black....Patience....

dharman said:
I repainted mine because I have a black pro and thought the chrome stuck out to much.

It is a really easy mod. Once you have the headlights apart the bezel pops right out. I used some fine grit sandpaper and started taking off the chrome. After that I went in with my black paint and started the long process of very thin coats of paint. The reason this mod takes so long is because of the constant spraying and waiting in between to get tacky before you go at it again especially with the amount of curves.

This is a great sitting on the front steps drinking beer waiting for paint to dry mod.

murda79 said:
^^^steel wool works great too, that's what I used.

From what I have seen...It looks like an awesome mod. I can tell the time & patience is worth it. Everyone's look really great.

I really appreciate everyone sharing their pics & suggestions. I can see my future weekend project. :)
 
bazooka joe said:
i gotta do this!!

do it...do it...do it...hahah it looks so much better.
 

Attachments

  • 554484310_l.webp
    554484310_l.webp
    20.7 KB · Views: 231
  • IMG_0720.webp
    IMG_0720.webp
    31.4 KB · Views: 222
On my black p5, should I use flat black, or will gloss look good? I have gloss now, but if the flat will look better....
 
I agree, blacked out looks best ... on all color P5's :)


I picked up a set of Canadians only because I planned on intalling a set of P5 lights in my MSP (painted oem ones from my P5 - confused?). Otherwise I would have just painted them.

Virgin Canadians
canblk1.jpg

canblk2.jpg


Mounted up
323F%20wheelz%20profile.jpg


Here's how to pull the bumper
clipmanual.JPG


And here are those @#*$ clips everyone is talking about (fig. 09-10 above)
lightclip1.jpg


Here's the part #'s for them - I recomend you pick up a set if you plan on taking your bumper cover off more than once
M+S%20062.jpg
 
Back