How To: Make your exhaust manifold heat shield shiny as a new quarter

CasopoliS said:
Yes it should turn black. What kind of wheel are you using?
It's a Craftsman compound wheel-drill accessory, using 3M rubbing compound (NON-fine cut). The compound solution is a tanish peach color. This is taking alot longer and harder than expected. Do I need to get the "fine cut" compound OR the "softer" polishing wheel (the one Zen uses in the video)?

I literally put on 30+ coats and used half the bottle and noticed some results but no reflection (yet!). Should I buff after it is completely dry or when it is just a hazy-dry?

Any feedback would be much appreciated.
 
Try using the white compound that came with the Craftsman drill polishing kit. That is what I used and it came out great (granted I used a high speed bench grinder). It should just take you a little longer.

While the buffing wheel is spinning, hold the white compound so it makes contact with the tip of the buffing wheel. Then go to work on the heat shield.

When finished buffing, hand polish it with some metal polish and put a light coat of wax on it.

Mark
 
Mark94 said:
Try using the white compound that came with the Craftsman drill polishing kit.
Yeah, but that stuff is hard as a rock...maybe mine is just dried out. Should I take a blow dryer to it and heat it up?
 
No, it is supposed to be hard. It won't cover the buffing wheel like a liquid.

Make sure your drill rotates at a high speed and hold the compound where it just meets the buffing wheel.

Let it make contact on the compound for about 5-10 seconds then go to work on the heat shield. When you sense it isn't working very well then apply more compound to the wheel.

After a few times of doing that you will slowly start to see it wear down.

Mark
 
my 2 cents/how to

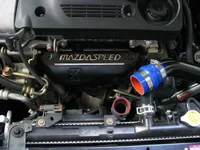
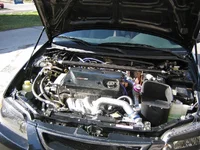
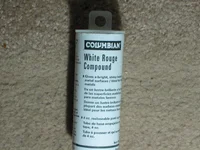
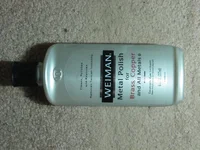
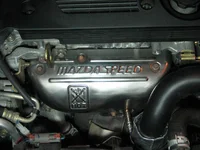
just finished mine up tonight. here's what I did if anyone cares. Started with the solid rubbing compound (pic 1) and a hand drill buffing wheel (both from home depot). I used the stick like a crayon and rubbed it all over the HS. After that I used the drill/wheel and buffed it all out. the results were not that impressive at all. So I decided to try it again. Colored the HS with the stick and went to town. Results were a little better. So I decided to run to the hardware store and get (pic 2). I applied a generous coat of the liquid polish and let dry about 10min. buffed out and KABOOM, results. but still not ulta shinny so I did yet another coat of the liquid polish. pic 3 is my final results (don't mind the rusty bolts, they'll be changed out by this weekend). I've seen way better jobs but here's yet another way. Sorry the pics are kinda bad it was dark out so I used my shop light. I definately recomend a bench grinder/buffing wheel, and don't go cheap on the buffing wheel, i did and it sucked! BIG thanks to ZenProtege for the original how to!! I went everywhere to try and find the 3M polish. I guess I should've just talked to my buddy how works for 3M.

Good luck to all and happy modin'
 

Attachments

  • 100_0042.webp
    100_0042.webp
    472.7 KB · Views: 220
  • 100_0043.webp
    100_0043.webp
    585.1 KB · Views: 208
  • 100_0044.webp
    100_0044.webp
    409.6 KB · Views: 246
Good job.
I wish I knew exactly how I got mine looking like a mirror.... maybe it was the compound, maybe it was the wheel, who knows. All the stuff is at my buddies garage over 2 hours away. If I ever figure it out I will let everyone know. Nonetheless, everyone on this thread has improved their engine bay. (first)
 
am i the only idiot that cant get the friggin heatshield off?
i got all the bolts out and moved the pipes out of the way and even took off the "hook" (used for putting the engine in).
did y'all take out the O2 sensor? there is absolutely no way to get it around the O2 sensor.... I'm going to Autozone tomorrow to get an O2 sensor socket
 
You can make an O2 sensor socket if you have the tools.... though if its cheap, just buy one. Its really just a socket with a groove down one side for the wire. This is what I use, and it has worked just fine. Good luck!
 
well i tried getting a wrench on there, but i didnt have the right size (par for course). seems that i am supposed to get a O2 sensor socket... i always look at them when i'm at autozone thinking, this may come in handy one day.
 
Wiggles422 said:
am i the only idiot that cant get the friggin heatshield off?
Heh. If you read my posts you'll notice I also had a hard time. You pretty much *have to* take off the hard pipe first which can be almost impossible unless you heat up the bottom end with a blow dryer. Then the wire adapter connected to the O2 sensor clips off easily and detaches. After the hard pipe is moved out of the way, you have to angle the heatshield a little to remove it; I still ended up scratching the gold looking pipe underneath the heatshield. No biggie. It might just be easier to use that O2 sensor socket you're talking about; didn't know you could get that. Let me know if it works out.
 
Wiggles422 said:
am i the only idiot that cant get the friggin heatshield off?
yeah it's a bitcfh, it just takes a little friendly persuasion. I was at a point where I was about to give up cuz I didn't want to mess up anything witht the O2 sensonr but some how I found a way. Good luck (thumb)
 
My hard pipes might be in the way too. I think I'll either have to forget this, or just try with the damn thing on. Either way, next year I'm going to be getting a new mani so, we'll see.
 
I had the same problem at first but be patient, you will eventually get it off. If I remember right I pulled the side near the 02 sensor as far back as I could and then I pulled the passenger side part off next. Its hard to get it out from under the pwr. steering bracket but it will go. just be careful not to put much pressure on the 02 sensor
 
got the O2 sensor out with out a problem. it didnt get as shiny as i had hoped, but i think i'm going to try a different approach tomorrow... if i get around to it
 
1000th post :)

well i couldnt get it as shiny as i was going for... so i decided to try a different approach.
not the best paint job ever, but i figured i'd wait and see if this paint holds up before wasting more time perfecting it.
 

Attachments

  • after1.webp
    after1.webp
    49.8 KB · Views: 254
Wiggles422 said:
well i couldnt get it as shiny as i was going for... so i decided to try a different approach.
not the best paint job ever, but i figured i'd wait and see if this paint holds up before wasting more time perfecting it.
Thats what I wanted to do, let me know how it holds up.
 
I started to polish mine and it came out great!(boobs)

BTW, Wiggles. Get some high temp blue paint that matches your hardpipe silicon adapters and use that to paint the Mazdaspeed that you left unpainted(thumb) . If you use the light blue I think it would good with the black.
 

Attachments

  • manifold3.webp
    manifold3.webp
    170.3 KB · Views: 260
Back