Perfect Install on Prosport Boost Gauge

stin987

Member
:
2008 Mazdaspeed 3 GT White
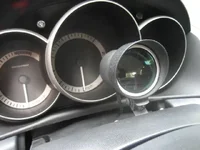
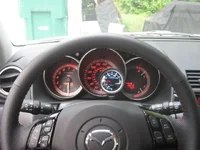
After about a week of trial and error, I finally decided on a way to mount my Prosport electrical boost gauge. See the pics below and tell me what you think. Other mods include Forge BPV, Cobb intake is on backorder can't wait to receive. Only have 750 miles on the car an still lovin it.
 

Attachments

  • IMG_1299.webp
    IMG_1299.webp
    26.2 KB · Views: 398
  • IMG_1301.webp
    IMG_1301.webp
    33.8 KB · Views: 436
Last edited:
looks a bit too far to the left..

It is that way so I can still move my steering column to any position without interference. I my still have 1-2 mm of space but I had to remove the plastic to drill the holes for the mounts so I got it pretty dang close. I only had one shot at it.
 
I put my ProSport in the same position, but didn't use the glare shield and it sits flush to the column. I'm debating raising it a little so I can use the shield.
 
Where is the electric gauge plugged in?? I know where a mechanical one goes :p

Except for the need to power the device, an electric is connected to the same place as a mechanical. It just has a device that sits under the hood and converts the pressure to an electrical reading which is then fed to the gauge.
 
Except for the need to power the device, an electric is connected to the same place as a mechanical. It just has a device that sits under the hood and converts the pressure to an electrical reading which is then fed to the gauge.

oooo ok thx sorry but one more thing but mechanical needs some power also for light right??
 
Last edited:
oooo ok thx sorry but one more thing but mechanical needs some power also for light right??

Yes. They both need a power supply. Some of both also have connections for illumination so they change when your lights come on and off.
I find that the easiest place to connect for this stuff is to use the radio harness. You have constant power, switched power, illumination, and a heavy ground cable that can more than handle the addition of a couple of gauges all in the same spot and wiring diagrams are readily available.
 
Last edited:
Back