
Some vital components came in the mail this weekend, and I spent another block of hours trying to get everything to fit and look and work the way I want it to.
This all started with a timing belt change about a month ago now. I should have taken some before pics, but here is what it looks like now, along with some long winded explanations.
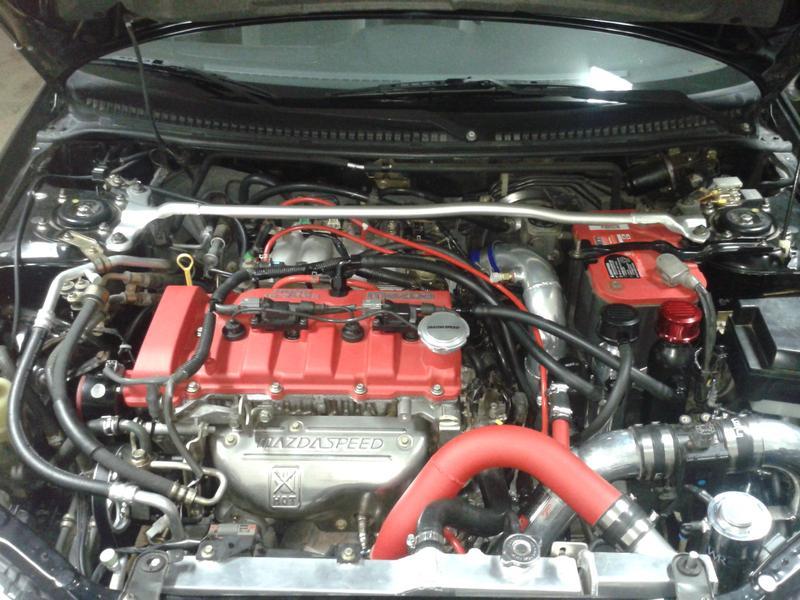
Since the valve cover had to come off, it was time to finally put on my powder coated VC that I polished over a year ago.
Since the belts were coming off, I put on the aluminum power steering pulleys that has been sitting around forever. I have the alt pulley as well, but gave up on that after a lot of frustration.
The water pump and idlers were replaced as per a normal timing belt change, although everything but my alt pulley was actually mint.
The first big roadblock was that my timing belt cover was destroyed from heat, so I had to order a new one. While waiting, I decided to polish my heat shield and do more general cleaning.
While cleaning, I found oil in my Injen near the turbo inlet, and CR3's PCV system is the only good solution. The color combo was picked to match the general black, red, polished theme, and my VC was sent to him to be machined. The only problem with the cans is that they need to be mounted. It required a custom bracket in front of battery, which then required 90 degree AN fittings which were incredibly expensive. This thread explains that whole process and has some good shots of my bracket.
http://www.mazdas247.com/forum/showthread.php?123809825-GB-Signature-Products-Oil-Catch-Cans&p=5900700&viewfull=1#post5900700
A while ago, I wanted to run an experiment to reduce turkey and improve drivability by running the boost source for the WGA off the intercooler pipes. This lead to my SLS hot pipe fiasco, and why it now matches my VC. The thread below has more info. The first and last post are the only thing worth reading.
http://www.mazdas247.com/forum/showthread.php?123798636-Fun...damental-flaw-in-this-half-ass-d-design
I knew I would lose some boost with this setup, so I wanted to get a Megasquirt going to datalog and control boost accurately, and of course, ultimately tune the car. However, Megasquirt tuning requires accurate air temperature readings near the throttle which is tough to do with our stock plastic. So I purchased used hard pipes, and had an IAT bung welded in. While it was being welded in, I purchased a proper HKS SSQV and had the BOV flange welded in as well.
The next problem was since I had to trade my stock cold pipe for the hard pipe, I had to get the HKS in before the car would run. The HKS snap ring is the bane of my existence. Look up a few threads on this. It is no picnic, but I eventually got it in with the help of a friend today.
Of course with the HKS installed, the Injen recirculation pipe no longer fits, and I had to cut it off. It was hard to cut up my $250 intake, but it had to be done. Then I had to find some 90 degree elbows and some hose to put the stock BPV veritcally between my SLS and Injen. The HKS sits a few millimeters from both the BPV and the PCV catch can. Here is a close up. I also capped the breather port on the Injen which you can see.

I need to run both valves because the Megasquirt is going to take a while to get right, and I want to be able to quickly switch back and forth between the stock PCM with the by pass valve, and the Megasquirt with the vent-to-atmosphere HKS. I would just recirculate the HKS, but the recirculation fitting costs more than I paid for the HKS itself. So unless someone has one laying around they'll sell me for cheap, I'll just pop the hood and swap the vacuum line from one to the other.
A lot of other things happened and are still happening. I have an NRG grounding kit waiting its turn to go in. My old trailing arms are off, but my megan racing arms are not in yet. I am going to have to run a few rounds of radiator flush since it's been sitting for so long, but it shouldn't be too long before she is back on the road and I can actually start tuning the Megasquirt. I'll probably order some black couplers to replace the blue ones on my cold pipe, but they are alarmingly expensive, so I'll probably hold off a bit. Verdict is still out on getting a 90 degree fitting for the top of the PCV can as well. It might look a little better with all three at the same angle.
While it's nice to save some effort doing things all at once, I definitely would have broken this up in more incremental steps had I done it again. There is at least starting to be a light at the end of the tunnel.
This all started with a timing belt change about a month ago now. I should have taken some before pics, but here is what it looks like now, along with some long winded explanations.
Since the valve cover had to come off, it was time to finally put on my powder coated VC that I polished over a year ago.
Since the belts were coming off, I put on the aluminum power steering pulleys that has been sitting around forever. I have the alt pulley as well, but gave up on that after a lot of frustration.
The water pump and idlers were replaced as per a normal timing belt change, although everything but my alt pulley was actually mint.
The first big roadblock was that my timing belt cover was destroyed from heat, so I had to order a new one. While waiting, I decided to polish my heat shield and do more general cleaning.
While cleaning, I found oil in my Injen near the turbo inlet, and CR3's PCV system is the only good solution. The color combo was picked to match the general black, red, polished theme, and my VC was sent to him to be machined. The only problem with the cans is that they need to be mounted. It required a custom bracket in front of battery, which then required 90 degree AN fittings which were incredibly expensive. This thread explains that whole process and has some good shots of my bracket.
http://www.mazdas247.com/forum/showthread.php?123809825-GB-Signature-Products-Oil-Catch-Cans&p=5900700&viewfull=1#post5900700
A while ago, I wanted to run an experiment to reduce turkey and improve drivability by running the boost source for the WGA off the intercooler pipes. This lead to my SLS hot pipe fiasco, and why it now matches my VC. The thread below has more info. The first and last post are the only thing worth reading.
http://www.mazdas247.com/forum/showthread.php?123798636-Fun...damental-flaw-in-this-half-ass-d-design
I knew I would lose some boost with this setup, so I wanted to get a Megasquirt going to datalog and control boost accurately, and of course, ultimately tune the car. However, Megasquirt tuning requires accurate air temperature readings near the throttle which is tough to do with our stock plastic. So I purchased used hard pipes, and had an IAT bung welded in. While it was being welded in, I purchased a proper HKS SSQV and had the BOV flange welded in as well.
The next problem was since I had to trade my stock cold pipe for the hard pipe, I had to get the HKS in before the car would run. The HKS snap ring is the bane of my existence. Look up a few threads on this. It is no picnic, but I eventually got it in with the help of a friend today.
Of course with the HKS installed, the Injen recirculation pipe no longer fits, and I had to cut it off. It was hard to cut up my $250 intake, but it had to be done. Then I had to find some 90 degree elbows and some hose to put the stock BPV veritcally between my SLS and Injen. The HKS sits a few millimeters from both the BPV and the PCV catch can. Here is a close up. I also capped the breather port on the Injen which you can see.
I need to run both valves because the Megasquirt is going to take a while to get right, and I want to be able to quickly switch back and forth between the stock PCM with the by pass valve, and the Megasquirt with the vent-to-atmosphere HKS. I would just recirculate the HKS, but the recirculation fitting costs more than I paid for the HKS itself. So unless someone has one laying around they'll sell me for cheap, I'll just pop the hood and swap the vacuum line from one to the other.
A lot of other things happened and are still happening. I have an NRG grounding kit waiting its turn to go in. My old trailing arms are off, but my megan racing arms are not in yet. I am going to have to run a few rounds of radiator flush since it's been sitting for so long, but it shouldn't be too long before she is back on the road and I can actually start tuning the Megasquirt. I'll probably order some black couplers to replace the blue ones on my cold pipe, but they are alarmingly expensive, so I'll probably hold off a bit. Verdict is still out on getting a 90 degree fitting for the top of the PCV can as well. It might look a little better with all three at the same angle.
While it's nice to save some effort doing things all at once, I definitely would have broken this up in more incremental steps had I done it again. There is at least starting to be a light at the end of the tunnel.


