Turning Heads and Snapping Necks: A Build Thread

:
2012 MZ5 Sport
Wanted to keep track of the bolt-ons/mods I'll be doing to the Mazda5 and hoping maybe it could benefit someone else in the future. As the title implies, looking to end up with a real clean look and a little bit of oomph. In the end, its still a minivan, so keeping that in mind.

Goals (in no particular order):
  • Upgrade brakes (MS3/similar)
  • Upgrade motor mounts (RMM, PSM, TSM)
  • 18" wheels
  • New paintjob (some scuffs and scratches currently)
  • Stiffer suspension (not slammed)
  • Rear sway bar
  • Reupholster seats (cloth to leather)
  • Shorten shifter throws
  • Upgrade audio system (new speakers, aftermarket audio interface)
  • Reupholster interior from tan cloth to black cloth
  • Replace smiley frontend with something more pre-2012 look (sorry smiley lovers :p)
  • Aftermarket wing
  • Refinish headlights (a little foggy)
  • Less plastic-ey/more responsive pedals
  • New shift boot
  • New intake
  • Aftermarket exhaust
  • Swap white gauge cluster LEDs for red
  • Oil temp / Oil Pressure / Coolant Temp gauges & custom pod
  • General maintenance items
  • New sporty steering wheel
  • Other things as I think of/remember/figure out
Not sure how long I get edit permissions on this inital post, but I'll try and cross these off as I get to them.
 
Last edited:
JBR Short Shift Plate

I'd been meaning to make a post like this, so a few items have been done already. Try and keep the blog posts out of it and just get to the good stuff.

Installing the JBR short shift plate was relatively easy. The hardest part was getting the airbox and battery tray/box thing out of the way. Once that was done, the plate installation was pretty straightforward.

I'd recommend using two flatblade screwdrivers to get the shifter cable link off of the transmission side, instead of a pair of needlenose pliers. That was really the only trouble I ran into.

Results:
The throws after the plate installation are really short. Like, way shorter than I thought they'd be. Still a little squishy, but a lot nicer to shift with if you're like me and are used to driving a more sport-oriented car, as opposed to a base model commuter car with a manual trans.

I ended up getting a new, heavier shift knob to go with the new plate: the Daytona Pro from Likewise and it really added to the sporty feel I get now. Sometimes the throws are a little too short and the synchros will pull me into a different gear, instead of neutral, but something I just need to get used to, I think.

Misc Notes:
The short shift plate came with a package deal on the short shifter bushings, but I ran out of time to install these. The placement of the Mazda5 bushings as opposed to the Mazda3 bushings are different, so the disassembly instructions JBR provided didn't really fit and I had to go on a little "interior disassembly adventure". Seemed too daunting at the time, so these will go in later.
 
JBR Rear & Passenger Side Motor Mounts

One of the biggest things to check on with the Mazda5 that I'd seen around the forums was the motor mounts. Rather than replace the mounts with the OEM ones that might wear out again later, I decided to go straight to 11 and get the JBR mounts.

Installation of the Rear Motor Mount and Passenger Side Mount were really easy. On the RMM, just supported the engine a bit, loosened the stock mount and the L-shaped connection piece, and it slid right out. Had to use a rubber mallet to get the JBR mount to slot in, but afterwards everything bolted right up like it belonged there.

Similar experience with the PSM: popped the coolant tank off its mount, removed the OEM mount, and dropped the JBR mount right in its place. Had to adjust the ground strap from the OEM placement a little bit so it would reach the new mount, but the bolt threaded right in the new spot.

Results:
The difference shifting with the new mounts is incredible. I was getting a lot of engine movement when shifting which really affected takeoffs, downshifting, etc. Anything that would cause the engine to move, intertia and all that.

The new mounts increase the NVH by like a billion, though. If that is going to be a concern with your passengers, maybe just get the OEM mounts. I'm talking like, the rear view mirror vibrates like I have a 12" sub in the back, kind of NVH. Especially at idle.

Even so, I would say it's worth. I feel like the van puts a little more power down on the ground (very little, but the butt dyno says so) and it really adds to the sporty feel.

Misc Notes:
JBR didn't offer a transmission-side mount, so I ordered the OEM mount. I didn't have time in the day I did these mounts to get all of the hardward removed to swap this one, so the jury is out until I get motivated enough to swap it out.
 
Sounds like fun. Seems only few go in like that on a Mazda5 often so good on you. I'll be back to see component selection and stuff. Years ago the plans were made for mine, but I've since lost and forgotten that list. Its possible better stuff is out there now anyway. Now that the van is getting near a big maintenance, perhaps its time to upgrade.

Nice format btw. made intentions clear!
 
Thanks for the support! Maybe not the best option when it comes to modding a car, but figuring stuff out and making it work anyway is half the fun lol.

A buddy of mine has a Mazda3 and I was able to get it on the lift to check out the exhaust for compatibility. It looks pretty dang close, might need an exhaust hanger welded on in a couple points, but it was enough for me to order the Mazda3 exhaust off the Corksport site. Should come in some time next week. I'll be back with some results on that for sure.

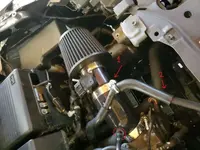
Also grabbed the short ram intake; that will be an easy fit.
 
CorkSport Short Ram Intake

An easy fit indeed. Even if there aren't any huge benefits to the high flow intake, the fact that I no longer have to deal with the huge stock airbox whenever I need to get underneath it is worth it for me.

Results:
None as far as I can tell. Even at WOT this poor van is just doing her best...
Hoping to get a nice easy breezy beautiful covergirl path from intake to exhaust with this.

Misc Notes:
If you're installing this, make sure of two things:
  1. You point the stud of the ring clamp on the manifold-side towards the front of the vehicle. CorkSport includes a harness that mounts on top of the stud on the clamp to hold the big squishy tube that I forget the name of. I had the clamp flipped around with the stud on the rear side and the clamp would have been angled weird, forcing the tube into a weird position, as well. Tried to keep it in an OEM position as possible. See number 1 in the photo.

  2. Make sure the big squishy tube is routed above the new intake, otherwise you'll have to unplug it from the pressure release valve and spill some coolant on your splash tray while you route it back around (number 2 in the photo is the squishy hose. That's what the professionals call it, actually).
EDIT: I circled the breather hose connection. CorkSport said it was a press fit and man was I pressing. It fit in, but there was still a good quarter inch of connector poking out of the port on the tube. Not sure if that's how it's supposed to be, but I'll keep an eye on it.

EDIT 2: The breather hose is still sitting as I left it just about two months ago. 🙏
 

Attachments

  • 98eb7d4afdae014cad2eb643ba759ff13fcc701f.jpg
    98eb7d4afdae014cad2eb643ba759ff13fcc701f.jpg
    99.3 KB · Views: 75
Last edited:
CorkSport Mazda 3 2010-2013 Exhaust, 2.0L

Lots of effort on this one with a pretty substantial return. I feel like I get a little more oomph on the throttle, nothing crazy, but I think its noticable.

Results:
She sounds AMAZING. A little bit of a boxer rumble with a few pops here and there. I even got a Camaro ZL1 to rev his engine at me as he looked around in confusion for the source of the "definitely not that minivan" exhaust tone.

Important Notes:
  • The racepipe and midpipe of this exhaust (AXL-6-119-12) routes through the heat shielding. The last portion, I suppose the axleback, will fit above the rear axle, but it is too short to connect to the midpipe.

  • Just one of the hangers on the new exhaust fit the original rubber mount point on the MZ5, the one closest to the cat just after the racepipe.

  • I had to have a shop cut the last flange off the midpipe and weld new pipe to fit over the axle and then cut the exhaust tip off the axleback and weld that on to the after-aftermarket pipe.
 
Last edited:
StopTech Drilled and Slotted Rotors, Pads, & Goodridge Stainless Steel Lines

Brakes were feeling a little "smooth" and did not give a lot of confidence when braking. I had been contemplating a big brake kit from CorkSport, but didn't want to dump that kind of money into a system that wouldn't see speeds higher than 80 MPH.

Results:
Good bite, real responsive.

Misc Notes:
Big fan of StopTech, I have a set of their drilled and slotted rotors and carbon ceramic pads on my Focus ST. Nothing crazy in this one, aside from being glad I bled the brake fluid; I don't think that had been done by the previous owners in a long time...
 
Good stuff.
So I cut off my muffler and welded in a test pipe with a nice rolled edge stainless tip. Didn't even sound as bad as I feared it might. Probably doesnt sound as good as the Corksport adaption you did though!
 
Back