Take 2: Second Head Under the Knife

Well, since I'm burning oil like crazy, I pulled my old head, and plopped on my spare. Anyway, that's fine. The valve seals aren't as far gone as the ones on the head that has now become my spare. The spare had undergone some light porting, polished exhaust runners and CCed chambers, been deburred, and chamfered the coolant and oil passages, blah-blah-blah.

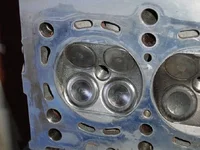
So, now I have this head sitting on my bench, going under the knife. It'll be put to the same stresses, only this one is getting a new set of lightened valves, a new set of Eibach valve springs, Toga valve seals and bronze valve guides to accomidate the lightened stainless valves. Titanium retainers, and new keepers. It'll be hot tanked, and I'll have the quenches welded up by DPR.

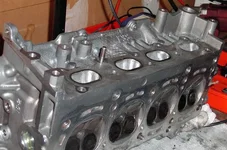
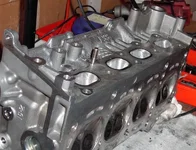
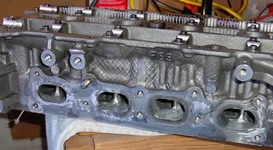
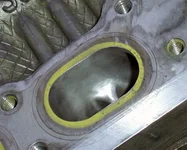
Right now, I've gotten as far as is shown in the pictures below, and I've ported the intake side, too. I still have yet to polish the exhaust side, but I'm planning on working on that tomorrow. I'm going to remove the stock valves once I get a new spring compressor (Old one got lost durring the move... Any suggestions on a new one?), and will do a preliminary cleaning. As it is, I cleaned off all the gasket surfaces, and the intake/exhaust mating surfaces will be lapped true at the same time that I get the head milled down about .010" to true.

If all goes as planned, I should have this done by later this year/early-early next year, as the work done by DPR will cost me a chunk of money, as well as the cost for the springs ($250), valve seals ($60), the valve guides (TBA), and the valves ($350-400).

Without any further ado, here are the pics.
 

Attachments

  • head-1-part1.webp
    head-1-part1.webp
    42.4 KB · Views: 313
  • head-2-part1.webp
    head-2-part1.webp
    39 KB · Views: 291
Well, here is the beginnings of the polished combustion chamber. I'm not really concerned too much about doing this, but I cleaned all the carbon off the valves, and at the bottom of the combustion chamber, I have it polished. But I'm not going to spend a lot of time with that, since the chambers will need to be welded up, but I figure the less work I leave for them, the sooner the turn around time will be be.

The other picture is a bad one of the polished exhaust side ports. They're really shiny, so the camera was having problems focusing. Hehe.

Edit: I got it to focus on one of the non-polished ports. =) This one has been buffed and sanded up to 230 grit, so it actually could focus. Stupid camera. The last pic is the only one out of twelve pictures that focused properly, even in macro mode.

By the way, my usual MO is to start with a grinding stone, then 40 grit sandpaper roll, 80 grit, then 120 grit, followed by 230 grit crossbuffing, then 380 grit cross buffing, polishing wheel, then polishing buff with a polishing compound to get a mirror finish.

This is only particularly important on the exhaust side. The intake side should only be brought up to about 230 grit, leaving enough surface for fuel to properly atomize. The mirror finish of the exhaust port, however, allows for carbon to just slip off the surface, rather than accumulating.
 

Attachments

  • combc1.webp
    combc1.webp
    49.9 KB · Views: 285
  • exhportpolished1.webp
    exhportpolished1.webp
    57.1 KB · Views: 252
  • port-230g-notpolished.webp
    port-230g-notpolished.webp
    36.3 KB · Views: 230
Last edited:
Well, no pictures this time, but a little bit of information that I forgot to post. =)

Firstly, I have some volumes for you all. Stock head specs are as follows:

Stock Head Gasket Thickness: .040" (1mm)
Deck Height: .060" (1.5mm)
Combustion Chamber Volume: 44cc (1cc max variance Low: 43.5, High: 44.5)
Piston Displacement Height: 4cc for stock 9.1:1, -4.7cc (Domed) for 10.4:1

I'll be ordering a new head gasket at .027" thickness, and the head is getting milled .010", which should bring me up to JUST shy of 11:1 compression, when all is said and done, and welding up the quench should put me around 40-41cc chamber volume, which puts me right where I want to be, at around 11.5:1 CR. =)
 
Last edited:
It would be nice if Mazda just did that for you from the start... I do know that time is money so it will never happen.
 
Time and better casting is money... Realistically, they sand/investment cast the whole head. What boggles me is they sand casted the combustion chambers, and investment cast the rest of the head... So, you have a nice smooth outer portion of the head, then the combustion chamber is nice and ragged, with crappy casting marks. Uugh. The exhaust and intake runners have nice, huge casting marks, too, which are rather obnoxious. I've polished those off, too, though, so they're nice and smooth.

And don't even get me started about how long it takes to deburr one of these heads! Grrr...
 
Any consideration for the larger intake porting like I did? I actually cut out the gasket where it has the extra cork inside the darker green rubber ring and then portmatched to that spec. I would like to get another opinion on it since I went straight to that without the basic gasket matching to begin with.
 
I'm not gasket matching at all... That would provide too much runner area, since I'm setting this up for 5500-7500 to be the range for peak power, revving out to about 8500 safely. Velocity is more important than volume to me. The last time I did this, I had a custom intake manifold gasket cut to fit the exact size I needed.

The exhaust side I've actually opened up about 2mm in width and 1.5mm in height. It was very convolouted there, and if you look down in there, you'll see that the twin runners are rather huge in comparison to the single port that they lead into, so I removed a lot of the edges, and knife-edged where the ports merged, to allow for better exhaust flow, where I feel this head is most restricted.

The intake manifold is ported out to an exact size (Have the measurements at home, somewhere, vertically, and horizontally), based on volume, and the length of my ITB's, plus where the port devides into each valve.

By the way, if you're planning on doing this, get a good breather mask. The bad ones I've been using are rather obnoxious, and hard to breath through.
 
You don't have to match gasket size per se. Use light, slow drying paint, and paint around the port, then attach the manifold. When you pull it off, you'll be able to see where the mismatch is and machine it off. Do the same with the paint on the manifold too.
 
Edit to the second post to show a picture of an exhaust port three steps from complete, since my stupid camera can't focus on totally polished metal. =) It's the third picture that's attached.
 
Nope, I've still got to get it tanked and get the valves removed, and so on. Lots of stuff do do, still. DPR has my 'before' results, and I don't remember what it was, perse, but they have the initial results, and they'll compare it for me once everything is all done.
 

New Threads and Articles

Back