How-To: One Touch Auto-opening Moonroof

Hey folks, I just figured out a way to make a "press-to-stop" function.

Where you would simply press "Close" to stop the moonroof from opening.
This is handy if you want to tweak the opening, or just crack it a little without opening it all the way.

All it takes is two-diodes, and a different order in the hook-up of the rest of the parts.
Fortunently, my parents bought at protege at the exact same time, so I will make a fresh guide using their car. (If they let me)
 
Sweet, I'm interested. Also, do you know of any way to keep the tilt down function independant?

Anywhich way, thankyou... I honestly was unaware of relays this size. I've only dealt with normal 30a automotive relays before. This setup streamlined my sunroof setup quite a bit. I put a 2nd relay on the opposite side of the unit that controls my close function. it's just a simple piggybacked switch. No cap or resistors necc. My alarm shows it a 8second ground signal which is perfect for closing the sunroof. (the extra 2-wires hanging off with connectors are hooked to aux channels from my alarm)

Eitherway, thanks man, MUCH improved from my previous setup (the one with the big pair of clunky relays hanging off to the side)
 

Attachments

  • P1040014.webp
    P1040014.webp
    41.4 KB · Views: 283
  • P1040016.webp
    P1040016.webp
    63.5 KB · Views: 285
  • P1040003.webp
    P1040003.webp
    47.2 KB · Views: 256
Poseur said:
Sweet, I'm interested. Also, do you know of any way to keep the tilt down function independant?
Cool, so you did your close function off the same capcitor and resistor?

As far as the tilt, the problem is that the cap gets enough charge that there is no pause between the down and open funtion.

Looking at the schematics for the 5door, you guys may be able to tap into the wire between the limit switch, and the motor/relay. Mabye you can use this to stop it.
 
hey i want the ability like the driver window if u press the button down a little it will stop when u let go and when u press it down all the way when u let go the window goes all the way down... i wanna have that on all the switches (only for me aka the driver) make the other ppl HOld the switch to put the window all the way down lol... is this possible and if it is how do i do it??
 
EviLMaN said:
hey i want the ability like the driver window if u press the button down a little it will stop when u let go and when u press it down all the way when u let go the window goes all the way down... i wanna have that on all the switches (only for me aka the driver) make the other ppl HOld the switch to put the window all the way down lol... is this possible and if it is how do i do it??
That is easier said then done.
The Driver's switch is a four position switch, where as all the rest of the window switches in the car are three position switches.

That and it's not just the switch, it has a whole timer circuit behind it.
Here is an image of the guts of the driver's side control box:

10-pcb.jpg


The three white box's are the normal windows switches, the blue/white box is the driver's side switch. Along with a relay, and other control electronics.

It can be done, but it's a lot of electronics to add-on.
 
Sweet Jesus!

Okay. I did the "Always On Moonroof" mod from ZapWizard. You'll have to read the reply on that thread to get all of the lowdown. It was pretty much okay, with only a few obstacles; nothing major, though. However, the mod for the "One Touch Auto-opening Moonroof" (also from Zap) was not so lucky. I can divide it into two groups: the things that happened during installation and the things that happened after installation. First, let's start with during installation:

1. I did the "Always On Moonroof" mod first, as Zap recommended. Like I said, it was pretty much okay.

2. I got all of the same parts (even the identical relay), except for the resistor and the capacitor. I had to go with a 1.5k resistor instead of a 1.2k and a 1000 microfarad capacitor at 25 volts instead of the 2200 uF capacitor at 35 volts that were in the instructions. Why? Because RADIO SHACK DIDN'T STOCK THEM! Morons.(rant)

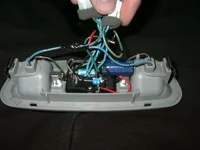
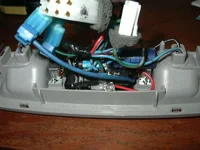
3. Taking out the control unit was a breeze, in no small part to Zap's pix and instructions. (brownnose Everything was pretty self-explanatory.

4. I got the relay all glued in and the two ends soldered. HINT: To make things easier on you (especially if you're relatively new to soldering, like me), bend the remaining two small end wires OUT at a 45 degree angle from the end wire that will be soldered to the #2 terminal. Believe me, this will help immensely when you go to solder them later on...

5. Halfway through the instructions, Zap recommends to use hot glue on all of the connections to protect them and prevent them from shorting out. Now, this was totally my fault and, I admit, I'm an idiot sometimes, but, please...WAIT UNTIL YOU'RE COMPLETELY DONE BEFORE YOU DO THAT!!! Yes, sir, it was real fun to have to go back and chip off the solid glue on terminal two to complete the resistor. And all because I took the instructions literally and did the hot glue right then! Not Zap's fault; my own. D'oh! (braindead

6. Be very careful of soldering the three end wires together on the left. If you're experienced, you'll be fine. If you're not, then you'll be a doofus and spend a fretful 45 minutes trying to clean up your mess. No joke. These end wires are very close to each other and can easily be the victims of runaway solder. HINT: Try tearing off a 2"x2" piece of cardboard and place it beneath the top wire of the capacitor when soldering it. It'll stay in place by itself and will save you the headache of dripping or runaway solder. That cardboard will also work for underneath the top end wire on the relay.

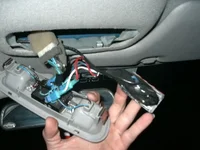
7. You need to remember that the pictures in the How-To give the illusion of lots of work space. THERE ISN'T. It's quite a tight fit, so I would highly recommend that you take the unit out of the car and over to your work area! Again, if you're experienced and think you can do it in the car, more power to you. However, if you're a noob who's normal soldering jobs would make Dr. Frankenstein himself proud, then don't.

Well, that pretty much takes care of the problems during the installation. Really, just some minor glitches, but nothing serious. The real problems came after the installation...

I got it all done, then tested it out in the car. Everything worked fine the first two times I tested it. Unfortunately, those are the only times it worked right. After the second time, it began to only open in intervals of a quarter. For instance, I pressed and released the button once, it opened 1/4 of the way and stopped. Then, I pressed and released it again and, once more, it opened up only a quarter of the way, to the halfway point, and so on and so on, until it was fully open.

Now, I figured that I probably used a capacitor that was too small and not holding the charge long enough, so I waited until the morning and tried it before going to work. Sure enough, it nearly worked all the way, then it did the same thing with the following attempts.

I've checked everything (all the connections and soldering and such) and everything checks out. I highly doubt that it's the 1.5k resistor, since that was already discussed. And I thought that the 1000 uF rating for the capacitor (which was 25 volts) wouldn't matter, since that was already discussed, as well. Plus, the "Always On Moonroof" mod works with no problems. So, if it's not the capacitor, then I'm at a loss, because I know everything else is done correctly. Even my terrible soldering job appears to be fine!

Someone, please help, because I would really like to have a functioning, one-touch moonroof. Sure, it still works in the normal fashion (push and hold), but what's the fun in that? In the meantime, I hope my experience can help others with avoiding any road-bumps. Hats off to ZapWizard for putting together a thorough and helpful How-To! Hope there's many more to come...
 
Last edited:
Thanks for the feedback.

The reason you can't work it multiple times in a row, is due to the capacitor holding a charge.

Here is how it works:
You press the button-the relay closes and the cap starts to charge up.
The relay stays closed as long as the capacitor is charging.
Once the cap reaches full charge, the relay disconnects.

If the cap still has 50% of it's charge left in it, the roof won't open fully.
So in this case add the drain resistor I mentioned in my guide.
This will speed up the cap's dis-charge.

I didn't use one, as it allows me to fiddle with the window for about a minute, before the auto-circuit kicks in.
 
Okay, so I got it backwards. I thought that the capacitor was NOT holding the charge for the required time, when, in actuality, it's holding the charge for too long, right?

If that's the case, then why does your larger capacitor (2200 uF@35 volts) work just fine without the drain resistor and my 1000uF@25 volts capacitor doesn't? Should I just replace the capacitor or would it be easier to simply add the drain resistor?

Also, does my 1.5K resistor matter? Should I have stayed with the 1.2K?

Finally, my project isn't a lost cause, is it? I mean, I can still get this mod to work, right? (dunno)
 
Last edited:
ZapWizard said:
Cool, so you did your close function off the same capcitor and resistor?

As far as the tilt, the problem is that the cap gets enough charge that there is no pause between the down and open funtion.

Looking at the schematics for the 5door, you guys may be able to tap into the wire between the limit switch, and the motor/relay. Mabye you can use this to stop it.
Oops, sorry didn't check in for a day and I missed a ton... Nope I didn't wire the close to the capacitor at all. I just used the same relay. It's essentially just working as an electircal switch piggybacked to the stock. My alarm's trigger signal is adjustable for time, so I set it to about 8seconds which is ideal for closing the sunroof. I'd imagine that if I did wire it for auto, it would possibly tilt open too at this point (atleast 'til we figure out how to get the tilt isolated from the open/close).
 
Correct, the cap is holding a charge for too long.

Your 1.5k is just fine, it makes up for the smaller capacitor.
Adding the drain resistor would be easiest.
You can also increase your timing resistor to get a longer run out of the cap.
As long as it isn't so big that the relay can't flip over.
 
ZapWizard said:
Correct, the cap is holding a charge for too long.

Your 1.5k is just fine, it makes up for the smaller capacitor.
Adding the drain resistor would be easiest.
You can also increase your timing resistor to get a longer run out of the cap.
As long as it isn't so big that the relay can't flip over.

Okay. Well, it's the opposite of what I thought the problem was, but now I know what to do. Yeah, adding the drain resistor should be far easier than replacing the capacitor. I'll try that this weekend and post the results. Thanks for the info...
 
Well, THAT sucked. I put on the drain resistor, but I still had the same problem as before. But now, there's a new twist. NOW, it opens up a quarter of the way and that's it. Sure, it'll open up the rest of the way if I hold down the button, no problem, but that's it. At least before, I could do the one touch and have it open in increments of 1/4. Can't even do that now...

I'm at a loss here. I thought that maybe the wire from the bare battery wires was too large (I used 12-gauge hookup wire, 600V, 80C, 1/32 PVC, stranded), but I switched it out with some speaker wire (just as a test!) and it still wouldn't work correctly. I rechecked the soldered connections and saw no problems there. I even cleaned up some of the worst ones, but nothing seemed to matter.

Here's a list of what I used:

1. 12 VDC Relay, identical to the one from the mod
2. 1.5K resistor, same brand as in mod, just not 1.2K
3. 1000 uF, 25 Volt capacitor, radial-lead
4. 30-volt soldering gun
5. .062, 60/40 solder
6. 22K drain resistor, same brand as the 1.5K one
7. Standard wire for battery power hookup (see above description)
8. Standard hot-glue and glue gun

I followed all of the instructions and have rechecked everything, but still no luck. I highly doubt that my '99 Protege LX is THAT different from ZapWizard's 2003 Protege LX, so, as I said earlier, I'm at a loss. Any ideals anyone?
 
man you have the best how to's, even if im not able to do them its still cool to understand how its done. Tanks again!
 
FLSilverP5 said:
now u need to do the one touch opening windows. hehe
It's on my todo list.
Well at least making the front's one-touch.

I plan to wire the passanger window into the automatic circuit that runs the one-touch driver's side.
 
I just finished this mod, only took 30 minutes, Works great, I love it. No problems at all. Thnx
 
holokaustos said:
Well, THAT sucked. I put on the drain resistor, but I still had the same problem as before. But now, there's a new twist. NOW, it opens up a quarter of the way and that's it. Sure, it'll open up the rest of the way if I hold down the button, no problem, but that's it. At least before, I could do the one touch and have it open in increments of 1/4. Can't even do that now...

I'm at a loss here. I thought that maybe the wire from the bare battery wires was too large (I used 12-gauge hookup wire, 600V, 80C, 1/32 PVC, stranded), but I switched it out with some speaker wire (just as a test!) and it still wouldn't work correctly. I rechecked the soldered connections and saw no problems there. I even cleaned up some of the worst ones, but nothing seemed to matter.

Sounds like your capcitor is charging too fast since you're only using 1.5K resistor with the 1000uF capacitor. To get similar charging time as zapswizard design you will need to use at least a 2600 ohm resistor but don't go higher than 3000 ohm resistor. I'm not exactly sure how the drain resistor works so I can't comment to see why are getting negative results after the installation.

If my calcuations are right that should fix your problem.

As for the power wire you don't need to use 12 gauge, 18 gauge is fine, wouldn't go any lower than that though. 18 gauge wire can handle about 10 amps of current. If you want to be on the safer side I guess you can go 16 gauge.
 
Last edited:

New Threads and Articles

Back