
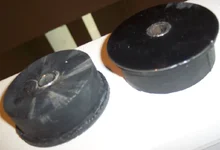
Ok, so I'm producing full replacement motor mount inserts for the stock rear motor mounts. I've made 2 sets thus far, one of them is in my car.
It vibrates a hair more than the stock rear motor mount, but is significantly stiffer. It's nowhere near as hard or rattle-y as the AWR rear mount. I haven't wheel hopped since I put it in, but I haven't launched really hard yet either. However, I've launched hard enough so that I would have gotten hop with the stock mount.
They are made from 60A poly, which is perfect for our application.
If these test out well, these will be available for sale.
I just need a tester who can put his own mount in within a few days of getting it, and to give me feedback, just so I'm not the only one running it. I want a few people to verify that they work well (Paulmp3 volunteered to be a beta tester as well) before they go prime time and I become an AMM.
They are expensive as HELL for me to make, so this beta one is going to go for $55 shipped. I'll probably set the price for the final product on $65 shipped in the continental US. So mount per mount, they cost about the same as the AWR full replacement mounts, but IMO, they're better. Like I said, they cost me a LOT to make. I'll actually be losing money and working for free until I sell 10 of them (ASSuming no issues), at which place I will have made a ~$10 profit for all of my hours of labor.
The install goes like this:
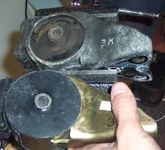
1-Remove the stock rear motor mount
2-Remove the stock insert. Easiest way to do this is to take it to a shop that has a press that can press it (along with the metal sleeve that contains it) out.
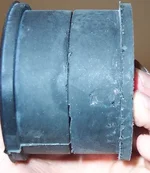
If you don't have access to a press, then cut out the center out of the mount around the metal sleeve. Then take one side of a hacksaw blade off of the hacksaw, slip it through the hole you created in the middle of the mount. Re-attach the hacksaw blade (so that now the sawblade is through the mount, but the top of the hacksaw sits outside of it), and saw completely through INNER metal sleeve. Now cut through the sleeve the same way on the opposite side, so that the circle is now cut into to equal halves (see attached instruction).
Once that's cut, just work the metal sleeve with the mount out of it.
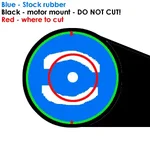
3-Now install the replacements. Make sure the lips of the poly mount inserts are pointing away from the center of the mount. Spray hair spray on them, and slip them inside the stock mount.
4-These mounts will make the rear of the engine sit a TAD higher than stock (less than 1/4"), but just enough to make it interfere with a bracket that resides near the mount. Simply rotate said bracket out of the way (you'll see when the time comes).
5-Reinstall, double check everything, and enjoy.
So who wants to test them out with Paul and I?
Replacements for other mounts are in the works. If this goes well, expect replacements for all four.
It vibrates a hair more than the stock rear motor mount, but is significantly stiffer. It's nowhere near as hard or rattle-y as the AWR rear mount. I haven't wheel hopped since I put it in, but I haven't launched really hard yet either. However, I've launched hard enough so that I would have gotten hop with the stock mount.
They are made from 60A poly, which is perfect for our application.
If these test out well, these will be available for sale.
I just need a tester who can put his own mount in within a few days of getting it, and to give me feedback, just so I'm not the only one running it. I want a few people to verify that they work well (Paulmp3 volunteered to be a beta tester as well) before they go prime time and I become an AMM.
They are expensive as HELL for me to make, so this beta one is going to go for $55 shipped. I'll probably set the price for the final product on $65 shipped in the continental US. So mount per mount, they cost about the same as the AWR full replacement mounts, but IMO, they're better. Like I said, they cost me a LOT to make. I'll actually be losing money and working for free until I sell 10 of them (ASSuming no issues), at which place I will have made a ~$10 profit for all of my hours of labor.
The install goes like this:
1-Remove the stock rear motor mount
2-Remove the stock insert. Easiest way to do this is to take it to a shop that has a press that can press it (along with the metal sleeve that contains it) out.
If you don't have access to a press, then cut out the center out of the mount around the metal sleeve. Then take one side of a hacksaw blade off of the hacksaw, slip it through the hole you created in the middle of the mount. Re-attach the hacksaw blade (so that now the sawblade is through the mount, but the top of the hacksaw sits outside of it), and saw completely through INNER metal sleeve. Now cut through the sleeve the same way on the opposite side, so that the circle is now cut into to equal halves (see attached instruction).
Once that's cut, just work the metal sleeve with the mount out of it.
3-Now install the replacements. Make sure the lips of the poly mount inserts are pointing away from the center of the mount. Spray hair spray on them, and slip them inside the stock mount.
4-These mounts will make the rear of the engine sit a TAD higher than stock (less than 1/4"), but just enough to make it interfere with a bracket that resides near the mount. Simply rotate said bracket out of the way (you'll see when the time comes).
5-Reinstall, double check everything, and enjoy.
So who wants to test them out with Paul and I?
Replacements for other mounts are in the works. If this goes well, expect replacements for all four.
")

