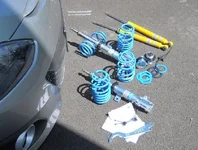
Bilsteins Arrived!

Racebrewer

Member
:
Mazda, Mazda 2 Touring MT
Bilsteins Arrived! (Now INSTALLED!)

Hi Everyone,

Thanks to Derrick at Corksports my Bilstein coilovers have arrived!!!!

As soon as it stops raining, I'll put the Darn things in.

More to come.....

John

Didn't rain today. Sunny and cool. Maybe I can do the install.????

And I did..........(friday) Now I need a beer and some Tylenol. Oh, and I have lots of photos....... Now I just have to figure out how to post them.....
 
Last edited:
Yeah!!!!

Can you please make a step-by-step how-to for the installation with pics, if possible?

Can't wait to see them on!
 
I'm jealous, I dont have a set of them on my 2 yet.

-Derrick
 
My wife just told me that the weather is supposed to be decent this weekend.

I'm also going to try and find a spring tester locally so I can check spring rates, but that ain't gonna delay installation. There are priorities.....

Installation looks straight forward.

I'll try and remember to take photos............(boobs2)

John
 
OK. I did the install and I took lots of photos. I'm just amazed I remembered the camera<LOL>

I didn't get to check spring rates, but such is life. My 'gut' is that they are all just a bit stiffer and that the rear stiffness was increased a tad more than the front so the balance of the car has changed slightly.

The initial driving impression is that there is a noticeable improvement in the handling. I've only driven it about 15 miles and there is an incredible amount of traffic out today so it was difficult to get a real feel.

I did notice several things. The first is that when you go into a corner the car "takes a set" quicker and doesn't 'jiggle' around as much so it is smoother to drive. You don't have to make as many steering corrections.

I was also startled by a noise going around several of the corners that I was able to take at speed. Took me a second to realize that the rear tires were squealing a little as the car went through corner. Not used to that in a front wheel drive car. It actually reminded me of my road race kart. When it was really hooked up well the rear would step out, the ever so slightest amount, and drift through a corner without binding up.

The install took about 4.5 hours using only hand tools except for an electric half inch impact tool to remove and install the nut on the top of the front struts. I did not use a spring compressor as there was only a slight tension on the OEM springs and none when installing the new springs. When removing the OEM springs from the struts I laid the strut horizontally on the ground, put my foot on the spring and spun the nut off with the impact. The strut jumped about a foot. Spring and top mount didn't move. If you are using just hand tools you probably want to borrow a spring compressor.

If you dont have an impact for the tops of the struts you'll need deep 17 and 19 mm sockets and a BIG Vise Grip (curved jaw) to hold them and metric Allen wrenches or T handles to keep the strut from turning. The sockets will probably get scratched up.

The front corners can be changed out individually. To do the rear, the car should be supported on a pair of jack stands to that the rear beam suspension can be drooped on both sides at once. If you try to do one side by itself the whole thing won't droop enough to get the springs out. Rear springs just pop out when you remove the shocks and the beam suspension droops fully.

Tools included a floor jack AND the OEM car jack. I used the OEM jack to move the corners up and down. Blocks of wood were handy. Jack stands of course, especially for the rear.

Tool list.

10, 12, 14, 17 mm wrenches and sockets. Also needed a 19 mm socket for the top nut on the Bilsteins. 20 mm socket for the wheel nuts. Torque wrench for the wheel nuts.

Various ratchets, a breaker bar, extensions and a flex adaptor to get at the back top strut mount nut under the hood.

I forgot to dig out the NeverSeize. Oh, well. Next time.

Vise Grip for the rear shock top and a side cutter for the Bilstein cable ties used to hold the brake pad sensor wire. I think that was about it. This would be a good time to install sway bars, mud guards, etc. Also, a good time to paint stuff like the top rear shock bracket which is aluminum and was starting to corrode. Maybe Electric Blue to match the Bilsteins?????

OK. All for now. More to come.

John
 
Last edited:
I use the same "put your foot on the spring and remove the nut" technique myself when I installed the H&R springs, works great!

-Derrick
 
Very, very nice write-up! Copied and pasted to my notes! ;)

Don't forget to include pictures, I can't wait to see them!
 
DSCN0025 (640x487).webp

OK This is my first test insert and the beginning of my morning (not too early) after a couple cinnamon raisin bagels and a LOT of coffee.

Lets see if this works.......
 
Last edited:
OK. That sort of worked. Lets try again.......

So with the parking brake applied and the car up on a jackstand and wheel removed.......
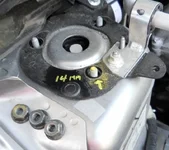
DSCN0029 (640x569).webp

That's the top of the strut. I marked one of the studs with yellow paint to put it back in the same spot. Didn't really have to do so. Used a 14 mm socket. One of the studs was hard to get to so I used a flex adapter between the socket and the extension.
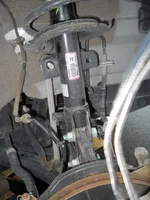
DSCN0030 (480x640).webp

Front right strut partially unbolted. The top rod end nut (hooks to the front sway bar) uses a 14 mm socket and there is a hidden hex that requires a 17 mm wrench to keep it from turning.

There is a bolt holding the brake line in place that requires a 12 mm socket or wrench to remove. The bolt was rusting so I'll replace it with a stainless bolt from my local hardware store when I get a chance. I like stainless bolts. Pretty..... Shiny.....

There is also a wire that runs to the brake assembly that is held to the shock with a plastic clip. Just pop the clip out with a screwdriver blade. Bilstein provides a replacement clip and cable tie.

At the bottom of the strut there are two bolts with nuts that require a 17 mm socket on a breaker bar and a 17 mm wrench to remove. When thats all done, just wrestle the strut out. I also used the OEM car jack under the ball joint to support the hub and lower it after the top strut nuts were removed.

UPDATE: Definitely support the hub with the OEM floor jack. Remove the 17 mm strut bolts at the bottom of the strut last. If you remove them before the top strut nuts (the ones under the hood), the strut can drop down and smack the brake line or speed sensor wires.

UPDATE 2:I double checked the 17 mm nuts at the bottom of the struts and one had loosened up. Tightened again with Loctite (Blue).

UPDATE 3: I found that one of the front ABS sensor wires was rubbing on one of the wheels. Make sure they get held away from the wheels.

Stay tuned....... BTW..... Assembly is pretty much the reverse with a couple minor differences.....
 
Last edited:
He'ssssss baaaack ! ! ! !

DSCN0031 (480x640).webp

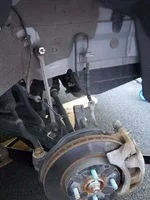
That's where the strut used to be,,,,,,

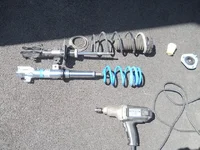
Now take the OEM strut and pop it apart. I used an electric impact driver with a 17 mm socket to remove the nut. It is under some tension so be careful...... I used the foot on the spring method described above. If you do it differently you may need a spring compressor. Its all fun and games until somebody loses an eye, so be careful. Pay a pro if you don't understand this process.:(
 
DSCN0034 (640x480).webp

This should be self-explanatory ( I hope). Old strut.... New strut.... Electric impact driver. No blood on the pavement-GOOD.
Used a 17 mm deep socket for OEM. 19 mm deep socket for Bilstein.

Top pieces from OEM strut go on the Bilstein strut. As far as I can tell the bumpstop is deleted. I couldn't figure out how to put it in place anyway........

The blue coating on the Bilstein springs scratches fairly easily. Unlike me, keep it off of the pavement when assembling or wrap in a towel... Oh well, nobody will see them anyway.
 
Last edited:
DSCN0035 (480x640).webp

WOW! Strut back in place.

Note the blue rubber/plastic isolator that goes between the bottom of the spring and th top of the height adjuster nuts. Easy to forget (Don't ask)

A couple things here. I used the OEM jack to raise the strut back up in place so I could get the studs on the top of the strut mount back in place easily. It also makes it easier to hook up the loooong end link (vertical silver shaft parallel to the strut) that goes to the sway bar. 14 mm socket on the nut and a 17 mm wrench to hold the hex on the back side.

Also, on the Bilstein strut there are a couple protruding studs. They supply special plastic clips that thread on, along with cable ties, to hold the wire that goes to the brake pads.

Tighten everything back up. Double check. Admire work. Put wheel back on and do the other side. Drop back to the ground.

Tomorrow the rear. Of the car....... You silly boys.....

Time for bed since tomorrow I have to be concious. I may be giving rides in a 1908 Lozier touring car for Museum Day at the Champlain Valley Transportation Museum. Not a big deal, except its worth almost half a mill'. Don't want to ding it......... (It IS NOT mine<LOL>)

John
 
Last edited:
I didn't realize how sore I was going to be for the next couple days. This getting old thing really stinks.....

Anyway, installing the Bilsteins in the rear of the car is a slight bit easier than the front. Do the fronts first and the back will be a piece of cake.

Both sides of the rear have to be done at the same time since the beam suspension has to droop all the way down so the springs can be pulled out.

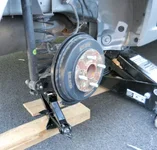
So put the car up on a pair of jackstands under the appropriate points. Remove the wheels and support the rear suspension with the OEM jack under the spring receptacles. That way both of the rear shocks can be unbolted at the bottom and the beam suspension can be lowered further. The bottom shock bolt needs a 17 mm socket to remove and its about a foot long (not really-but much longer than needed).

DSCN0036 (640x614).webp

The wood blocks made life much easier as I didn't have to crank the jack as much.

When the rear beam is drooped all the way down you can wrestle the springs out by hand as they are under no tension.
 
DSCN0038 (640x480).webp

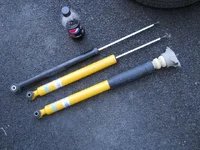
Top is OEM shock, second is Bilstein (OBVIOUS......Geez), third is Bilstein with OEM top bracket, shroud and bump stop. The top brackets are removed from inside the wheel well and are held in by 2 bolts that require a 12 mm socket and extensions to remove. The rear bolt on the gas cap side is hard to get a socket on without a long extension (or a couple extensions put together).

The top mount is aluminum and was corroding. If I had the time to do it, I would have wire brushed the mount and primed/painted.

Way top is a half empty bottle of Pepsi Max. More caffiene than fresh brewed coffee!!!!!!!

DSCN0039 (480x640).webp

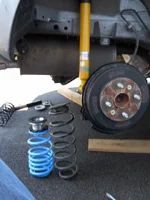
Here is a comparison of rear springs. The Bilstein and adjusters are much easier to install since they are much shorter than the OEM spring. Note the black isolator on top of the adjuster.

DSCN0041 (640x480).webp

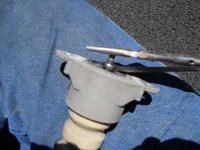
To remove/install the rear shocks on the brackets the top of the shock needs to be held by a Vise-Grip on the provided flats while the nut is removed by a 10 mm wrench.

Put the new shocks in place and raise the beam suspension with a jack and put the lower shock bolts in place. Wheels back on, car down, and you're done. Re-torque the wheels after a few miles.

Any questions, Grasshoppers?

Enjoy,
John(rei)
 
Last edited:
DSCN0042 (640x603).webp

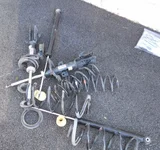
Whoa.... Almost forgot a picture of all the removed OEM parts.

Somebody make me an offer!!!!!!!!!!!

I'll follow up in a few days with anything I've had to revisit, fix, whatever......

The job took about 4.5 hours. Having done it once, a re-do would be about 3. Maybe less if all tools were at hand and with a lift. Even faster if I was under 50. Bottoms up..... (cheers)

John
 
yeah first time i did it took about 5. i think i can do the rear in 1 hour and the front in 1 hour.
 
I think that its the 58 years of experience(?) that slows me down.

That and I know 4 people who have been crushed to death. One under a car. Two between cars and one in an actual rock crusher. The one under the car was epecially sad as it was an 18 year old who didn't bother with jack stands when changing oil.
 
Whoa, what a nice write-up, thanx!!!!!!!

Can you post a couple of pictures of the car please? If so, how much it is lowered?

Thanks again, props to you!!!!
 
Back