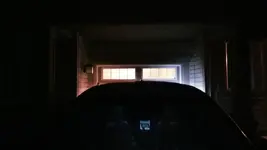
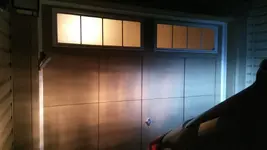
- :
- Canada
This is a DIY How-To for a reverse light bulb replacement/upgrade for the 2nd Generation Mazda CX-9. I decided to document this process as it seems nobody has done it yet. Hopefully this helps someone who wants to upgrade their lighting or save a trip to the dealership.
This process was documented/photographed by myself, using my crappy cellphone camera and my 2018 Mazda CX-9 Signature as the "demo" vehicle. This DIY is provided as a learning aid and reference guide. I assume no responsibility for any damages you may inflict on yourself or your vehicle.
What you'll need:
- Flathead screwdriver
- Replacement bulbs (halogen or LED)
The bulb type is 921 or W16W. I used LED bulbs with built-in resistors to avoid hyperflashing. The bulbs measure 41 x 5 x 15 mm.
1. Make sure the vehicle is off! Disconnecting the battery is not necessary, but you can if you'd like.
2. Open the liftgate, then pry open the bulb cover directly behind the light assembly. Use a flathead to pry out the slotted side, then slide the cover "away" from the centre of the liftgate to remove it.

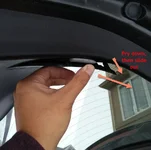
3. Unclip the white connector from the grey socket by pressing in the retaining clip on the white connector and sliding it out.

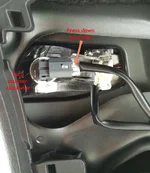
4. Turn the grey socket counter-clockwise. You'll feel resistance after about 1/4 turn, and the tiny arrow on the grey socket should be lined up with a small ridge on the bulb housing. Wiggle the grey socket out of the bulb housing.

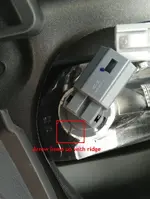
5. Pull out the original bulb and replace it with the new one. I took this opportunity to upgrade the halogen bulb to an LED bulb. Please do your research when buying an LED bulb to ensure that you get the right bulb and that you will not encounter errors from the change in voltage. I noticed that the circuit boards on the bulbs I used are a little thick, so I had to use a bit of elbow grease to get it in there, but it fits just fine.
6. With the bulb replaced, reinsert the grey socket into the bulb housing. Remember to line the arrow on the grey socket up with the ridge on the bulb housing when reinserting the grey socket. Turn it clockwise 1/4 turn to lock the socket in place.
7. Reconnect the white connector, then replace the bulb cover.
8. Repeat steps 2-7 for the other side, and you're done!
Here's a daytime comparison. I may reinstall a halogen bulb to do a light output comparison at night, as I forgot to do that lol. Also, here's an Amazon link to the bulb I used (non-affiliate link). They are 921 or W16W bulbs with built-in resistors, and measure 41 x 5 x 15 mm.


View attachment 218866
Hope that helped you guys out! If you have any questions, post them here and I'll do my best to answer them.
This process was documented/photographed by myself, using my crappy cellphone camera and my 2018 Mazda CX-9 Signature as the "demo" vehicle. This DIY is provided as a learning aid and reference guide. I assume no responsibility for any damages you may inflict on yourself or your vehicle.
What you'll need:
- Flathead screwdriver
- Replacement bulbs (halogen or LED)
The bulb type is 921 or W16W. I used LED bulbs with built-in resistors to avoid hyperflashing. The bulbs measure 41 x 5 x 15 mm.
1. Make sure the vehicle is off! Disconnecting the battery is not necessary, but you can if you'd like.
2. Open the liftgate, then pry open the bulb cover directly behind the light assembly. Use a flathead to pry out the slotted side, then slide the cover "away" from the centre of the liftgate to remove it.

3. Unclip the white connector from the grey socket by pressing in the retaining clip on the white connector and sliding it out.

4. Turn the grey socket counter-clockwise. You'll feel resistance after about 1/4 turn, and the tiny arrow on the grey socket should be lined up with a small ridge on the bulb housing. Wiggle the grey socket out of the bulb housing.

5. Pull out the original bulb and replace it with the new one. I took this opportunity to upgrade the halogen bulb to an LED bulb. Please do your research when buying an LED bulb to ensure that you get the right bulb and that you will not encounter errors from the change in voltage. I noticed that the circuit boards on the bulbs I used are a little thick, so I had to use a bit of elbow grease to get it in there, but it fits just fine.
6. With the bulb replaced, reinsert the grey socket into the bulb housing. Remember to line the arrow on the grey socket up with the ridge on the bulb housing when reinserting the grey socket. Turn it clockwise 1/4 turn to lock the socket in place.
7. Reconnect the white connector, then replace the bulb cover.
8. Repeat steps 2-7 for the other side, and you're done!
Here's a daytime comparison. I may reinstall a halogen bulb to do a light output comparison at night, as I forgot to do that lol. Also, here's an Amazon link to the bulb I used (non-affiliate link). They are 921 or W16W bulbs with built-in resistors, and measure 41 x 5 x 15 mm.

View attachment 218866
Hope that helped you guys out! If you have any questions, post them here and I'll do my best to answer them.
Last edited:

