Stiffen your Mazda 3, Speed 3 rear engine mount - for $4
I just got a CB Mazdaspeed 3 and there is a bunch of wheel hop and excessive engine movement caused by the rear engine mount design.
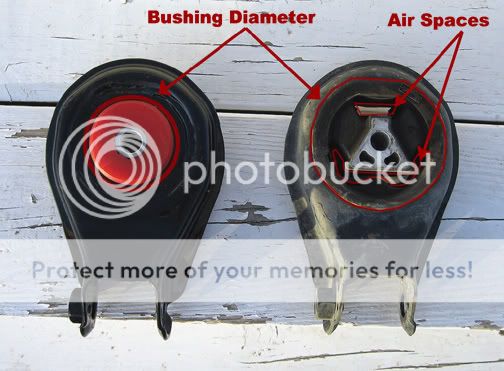
I read all of the posts on how to fix this by spending $90 and replacing it with the AWR mount with urethane bushings. I took the rear engine mount off to examine it and discovered that the main reason it is so bouncy is because it is only partially filled with rubber.
Engineered slop: (circled in red):

Before I shelled out $90 for the AWR I thought I would fill the gap and see how it performed. I bought a tube of 2 part - 6 minute epoxy from Lowes for $4. This stuff has a rated strength of 1900 psi so it will definitely hold up.
2 part 6 Min epoxy - Lowes $4:

I put tape on the back side of the mount to contain the epoxy. I mixed the entire tube of epoxy and poured it into the mount. 1 tube of this is all you need. It flows just right and entirely filled the gap. In about 3 hours it is rock hard (let it setup in a heated area). I installed the engine mount and took it out for a spin.
WOW!!! All the wheel hop is gone, the shifts are now "crisp".") Best of all: NO engine vibrations. One thing to note is that when you first start the engine, there is a small short thump, that comes from the engine mount. It's not a big deal just something I thought I would mention. Someone else also described noise this in another thread after putting in a high performance engine mount.
Best of all: NO engine vibrations. One thing to note is that when you first start the engine, there is a small short thump, that comes from the engine mount. It's not a big deal just something I thought I would mention. Someone else also described noise this in another thread after putting in a high performance engine mount.
There is no reason now for me to buy the AWR mount, at least I can't think of any. For $4 this is a great mod. I believe you could do this on the Mazda 3 as well.
STEP BY STEP:
0. remove mount from car
1. first tape the bottom of the mount completely with duck tape.
2. put mount on flat surface on a piece of cardboard
3.find a small container to mix it up in (a lid from a can of spray paint works great), squirt it all in and mix well.
4. pour the mixed epoxy in immediately after it is mixed (you have a few minutes before it starts to setup)
5. fill the mount all the way up with the epoxy
6. keep the epoxy out of where the bolt goes !
7. wait until very hard (about 3 hours)
8. remove tape
9. remount the mount in your car
10. tightened all bolts nice and tight
11. drive car - enjoy
One other thought: For those of you who think the epoxy wont give enough, the stock rear engine mount has enough rubber all the way around the center bolt that there is enough "give" to allow some movement of the mount. Also the stock rubber is softer than the urethane high performance mount, the epoxy just cements the whole thing together and gets rid of that pesky air gap in the mount.
I just got a CB Mazdaspeed 3 and there is a bunch of wheel hop and excessive engine movement caused by the rear engine mount design.
I read all of the posts on how to fix this by spending $90 and replacing it with the AWR mount with urethane bushings. I took the rear engine mount off to examine it and discovered that the main reason it is so bouncy is because it is only partially filled with rubber.
Engineered slop: (circled in red):
Before I shelled out $90 for the AWR I thought I would fill the gap and see how it performed. I bought a tube of 2 part - 6 minute epoxy from Lowes for $4. This stuff has a rated strength of 1900 psi so it will definitely hold up.
2 part 6 Min epoxy - Lowes $4:
I put tape on the back side of the mount to contain the epoxy. I mixed the entire tube of epoxy and poured it into the mount. 1 tube of this is all you need. It flows just right and entirely filled the gap. In about 3 hours it is rock hard (let it setup in a heated area). I installed the engine mount and took it out for a spin.
WOW!!! All the wheel hop is gone, the shifts are now "crisp".
Best of all: NO engine vibrations. One thing to note is that when you first start the engine, there is a small short thump, that comes from the engine mount. It's not a big deal just something I thought I would mention. Someone else also described noise this in another thread after putting in a high performance engine mount.There is no reason now for me to buy the AWR mount, at least I can't think of any. For $4 this is a great mod. I believe you could do this on the Mazda 3 as well.
STEP BY STEP:
0. remove mount from car
1. first tape the bottom of the mount completely with duck tape.
2. put mount on flat surface on a piece of cardboard
3.find a small container to mix it up in (a lid from a can of spray paint works great), squirt it all in and mix well.
4. pour the mixed epoxy in immediately after it is mixed (you have a few minutes before it starts to setup)
5. fill the mount all the way up with the epoxy
6. keep the epoxy out of where the bolt goes !
7. wait until very hard (about 3 hours)
8. remove tape
9. remount the mount in your car
10. tightened all bolts nice and tight
11. drive car - enjoy
One other thought: For those of you who think the epoxy wont give enough, the stock rear engine mount has enough rubber all the way around the center bolt that there is enough "give" to allow some movement of the mount. Also the stock rubber is softer than the urethane high performance mount, the epoxy just cements the whole thing together and gets rid of that pesky air gap in the mount.
Last edited: