New rear brake pads

Donewood

Member
:
2007 Mazda5 GT 5MT
Just changed the pads and Discs on my 2007 Mazda 5. And I though I'd share somethings with you.

First off pretty easy job all around, very glad I didn't pay some clown $500.00 for a brake job!!!

First off the rear brake uses a "spiral piston" to facilitate the E Brake. Hence to compress the cylinder they have to be pushed in and turned clock wise simultaneously. My local auto supply places have a universal tool for this purpose at just under $200.00.

Man am I ever glad I didn't go for it. (I like to buy tools when I'm saving labour! but only when they make sense).

When you pull the pads off, you will see that there are two holes in the face of the cylinder. These accommodate the special tool which has two pins on its face. Now you could make a stick with two nails in it or machine something more elegant. Or you could do what I did and just stick your needle nose pliers into it and push and turn. Dead easy!!!

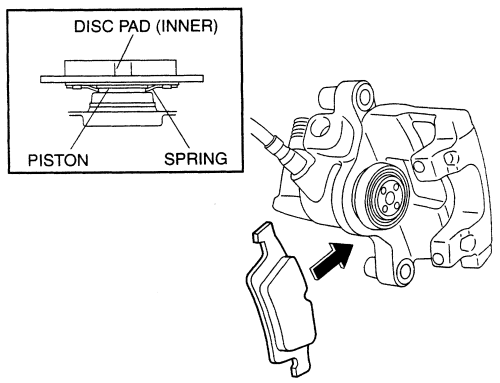
When buying pads try and get the "Type two" (with one spring instead of three) rear pads as the spring doesn't require any effort to seat.

The old brake disks (rotors) are just compression fit and held on by the wheel and lug nuts. Just beat them with a hammer until they pop off. (your replacing them anyway.)

Fronts are super easy. pull the Caliper and use a C Clamp on the new Pad against the piston. Slowly apply pressure (no bleeding or anything required front or rear, and don't top off the reservoir until you finished the whole job) I could do all four in about an hour now that I have done it once.

When you restart the car the "Brake and ABS" Idiot lights will be on but should go out when you pump the brakes and the pucks seat themselves the correct distance from the discs.

Saved mega buying drilled slotted discs and shoes on line. and doing it myself. With my new summer tires the car is stopping great!

Hope this helps someone save big as well. Have a great summer!

Just checked with Calgary dealership, they charge 3 hrs shop time @ $143.00 for a job total of $960.00 Wow no wonder they call them the stealership!!! And that's for the documented inferior factory rotors!!
 
Last edited:
I was thinking of tackling this in a couple of weeks. Did you bleed the brakes? If so was it difficult? Also the tool for the rear, I wonder if it is something you could rent from O'Reilly's or Autozone.
 
I borrowed the tool for the rear from Autozone. Left a deposit and got it back when I returned it. No cost loaner...nice.

Be sure to clean up and lube the slider pins and boots. The boobs who did my previous brake job didn't appear to have done that, and my rear brakes dragged slighty until I did my own last month. No more squealing in reverse. Nice.
 
Just reread my post, Guess I wasnt so clear. No need to bleed either front or back, if you don't have air in the lines (brakes feel spongy?) And nil requirement for the special cylinder compressing too.
 
You can easily compress the cylinder with needle nose pliers. No fancy tools required. Just make sure you remove the brake fluid reservoir cap when you do it.

No air would have entered the system if you're just changing pads, so no reason to bleed unless you want to change out the fluid due to high mileage or something. If you do bleed, just keep an eye on the reservoir and keep filling it before it empties or you get air in the line.

Also, if you are thinking about changing rotors due to vibration, be sure and sand them with some 180, or so, sand paper to get the plastic crap from the pads off the rotor before you buy new rotors. Many will tell me from behind the keyboard that I'm wrong, but I'll say it anyway. The only rotors that truly warp are on cars that are being raced. Period. Now that I sand rotors, I never have to replace them. I've got an F150 with 290,000 miles on the original rotors. The results don't lie.
 
Last edited:
Replaced the rear pads on my '08 5 this past weekend after an earlier aborted attempt. I ordered Akebono pads, which are the bottom pads in the picture below. I had read something about a revised "Type 2" pad design, but couldn't for the life of me figure out how to properly install the new inner pad.

Top row: OE pads - outer pad on left, inner pad on right
Bottom row: new "Type 2" Akebono pads outer pad on left, inner pad on right
IMG_0485.JPG


After additional internet searching, I found some diagrams (including the one below) that made it all make sense. The brake piston has a groove that the new design pad slips onto. The new design springs clip into place on the groove. When installing the inner pad, I slid it onto the piston after compressing the piston and before sliding the caliper back onto the carrier. Hope this saves some time and aggravation for someone else.

0996b43f80208043.gif
 
Replaced the rear pads on my '08 5 this past weekend after an earlier aborted attempt. I ordered Akebono pads, which are the bottom pads in the picture below. I had read something about a revised "Type 2" pad design, but couldn't for the life of me figure out how to properly install the new inner pad.
Are those OE Mazda replacement pads or did you get aftermarket Akebonos? I have a NIB set of OE Mazda pads (NOT the value line) and they are listed with a mishmash of FoMoCo+Ate+Akebonos (lining) but does not have the clips so I'm guessing they might be the older Type 1?
 
Are those OE Mazda replacement pads or did you get aftermarket Akebonos? I have a NIB set of OE Mazda pads (NOT the value line) and they are listed with a mishmash of FoMoCo+Ate+Akebonos (lining) but does not have the clips so I'm guessing they might be the older Type 1?

The new pads (the bottom set in the picture below) are aftermarket Akebono Euro Ceramic pads. The top set of pads in the picture are the OE pads that I removed from the car. The inner OE pad (top right in the picture) does not attach to the piston. Instead, the spring holds the inner pad steady against the carrier. If your new OE Mazda pads have a spring on top instead of clips, they're the older Type 1 pad.

IMG_0485.JPG
 
Last edited:
Glad I read this post! Didn't know about the type 2 pad. That little spiral spring on the type 1 pads is a pain in the.....you know!

However, last time I had my brakes apart, I used the needle nose pliers to compress the piston, but it never retracted to its original position once I had it all back together, and as I drove the outer pad rattled around because the piston retracted so much. So I took it apart, moved the piston a bit, and it ended up being too far! Drove for 5 mins then noticed smoke from the rear wheel! So the 3rd time I did it, it seemed to work. Maybe that caliper is sticky.

Either way I've got to replace the brakes this year. The quality of the pads and rotors on the car are just terrible. They were brand new when I bought it used. But they must have used the cheapest stuff available.
 
Just changed the pads and Discs on my 2007 Mazda 5.

When you restart the car the "Brake and ABS" Idiot lights will be on but should go out when you pump the brakes and the pucks seat themselves the correct distance from the discs.

If you had pumped the pedal before starting, odds are you would not have gotten the brake/abs light. ymmv
 
However, last time I had my brakes apart, I used the needle nose pliers to compress the piston, but it never retracted to its original position once I had it all back together, and as I drove the outer pad rattled around because the piston retracted so much. So I took it apart, moved the piston a bit, and it ended up being too far! Drove for 5 mins then noticed smoke from the rear wheel! So the 3rd time I did it, it seemed to work. Maybe that caliper is sticky.

Either way I've got to replace the brakes this year. The quality of the pads and rotors on the car are just terrible. They were brand new when I bought it used. But they must have used the cheapest stuff available.


It appears your calipers are definitely sticking. That will mess up your pads & rotors & brake fluid. I'd fix the calipers ASAP.
 
Just changed the pads and Discs on my 2007 Mazda 5. And I though I'd share somethings with you. Or you could do what I did and just stick your needle nose pliers into it and push and turn. Dead easy!!!

I am pressing in as much as I can and have rotated the piston at leave 5 revolutions and I measure no diff....any suggestions?
 
Either rent the right caliper tool at a local automotive parts store or buy the harbor freight set. It can be a bear of a job without it, but takes seconds with it.
 
I need to correct the info above about type 1 & 2 pads. The style with the bunny ears is the new style and the locking springs is the old. 04-05 mz3 was equipped with the locking spring style but was subsequently changed to the new style due to poor performance of the locking spring. In rust belt area the locking springs will rust to pieces causing the inner brake pad to rattle in caliper bracket while not braking. The new style will not rattle as long as it's installed on the inside correctly.
 
I got it...need Wheaties or the gym....I braced it against the inner wall and pushed REALLY hard to get it started. I used extra long needle nose and that really helped. (my rotator cuff is now complaining though.)

AND, use the e-brake to seat the piston before starting and of course, pump the pedal before starting too. No abs light.
 
Either rent the right caliper tool at a local automotive parts store or buy the harbor freight set. It can be a bear of a job without it, but takes seconds with it.
x2 Only way it should be done. You "can" get away with needle nose pliers but why struggle when you can rent free tools to get it done easier (shrug). Even the universal retraction block doesn't work out too well.

Glad to hear the "bunny ears" are the newer type!
 
Back