One of the best and most informative vehicle forum posts I have ever found/used.
My 2010 CX-9 failed inspection because 3rd brake light not working. As I did troubleshooting, I thought the regular tail lights looked dim as well when braking (not nearly as bright as they should be if lights were already on). Found this post when googling symptoms, then rechecked 3rd brake light in the dark and saw that it was barely illuminated, so not a broken light, but rather an electrical voltage issue and this thread pointed me to the right location.
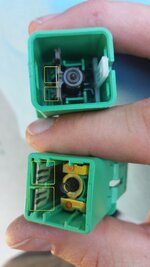
Based on other comments, I removed my switch and opened up to clean contacts. Switch is definitely tricky to open up as mentioned in previous post because you have to pry from both ends at same time to release clips. I ended up just breaking open the clip retainer on one side to make it easier. I originally only cleaned the stationary contacts because I hadn't read through all the posts and I was rushed to fix. Reinstalled and lights were improved, but still not working right.
After looking at excellent photos provided by Mako925, I took apart again and used precision screw driver to scrape residue on the moving contacts on the plunger side along with WD40. I also pried them out a bit so they would make a stronger contact point when engaged with the stationary contacts. Put back together and everything worked perfectly.
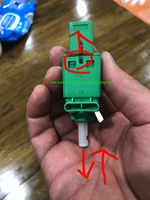
I would like to add that after inspecting the switch, that the white plunger is not actually "adjustable". It is made to be either fully extended (if the spring is not fatigued and can still extend it all the way) or fully inserted (by the brake pedal) to the stops where it comes into contact with the stationary contacts. However, when you take it apart and move the plunger around to clean the moving contacts, you could risk it not being reseated properly before putting the switch back together. The white plastic tab on the side is a guide that helps control the travel of the plunger via a small metal clip and those pieces can get misaligned while cleaning.
The bottom line is that these pieces need to be placed back in precise position before popping the switch back together. I suspect that the posters who had issues probably pulled on the plunger until it got back into position to get it working again. Because of their posts, I noted that my plunger wasn't fully extended before I snapped it back together and then I saw it was because the movable contacts were striking the plastic that you can see in Mako925's photo. I used my precision screw driver to "tuck" these contacts in behind the plastic guide and push it down all the way (and fully extending the plunger).
I am so happy that I was able to fully restore everything in only about 20 minutes (following an hour or so of research) and didn't have to pay hundreds of $$ to the dealer trying to find the issue. I would also point out that if you aren't comfortable popping open the switch, you can buy one on Amazon for only about $28 for the OEM part or you can get an after market switch for much less (I bought one as a backup for $15 in case I need to fix this again). For that price, I figured I would just replace it with a new one. Just search for part L23266490.

")