
This thread focuses on adding high-beam DRLs to either your U.S. or Canadian Mazda 5.
Background
I love my Mazda 5, and find a great vehicle to drive. I had noticed that it didn’t come with the DRL feature as an option. With the Ford Escape we replaced, I was able to have the dealer reprogram the Smart Junction Box to turn on the DRLs. This is not the case with Mazdas, which necessitates the need for a DRL kit.
At first I thought I wanted the DRLs to be like OEM Canadian models (on the low beam) but that wouldn’t help those in the U.S. who have HIDs on the low beam, plus the low beams might burn out faster if they were the primary DRLs.
Secondly, I know that there are those out there that either like DRLs or don’t like them. This thread is not to debate the good or bad, but merely to offer an option of adding. The silver color of our 5 and the two lane roads we travel often was a consideration for me adding them. (On a side note, my insurance company offers a 15% discount for adding them)
Lastly, the following procedure worked on my vehicle; however, I make no guarantees that you will get the same results. I also cannot be responsible for any damages you may incur while installing, or after. I merely offer this thread to save others time who wish to add DRLs to a Mazda 5.
Materials
• Hamsar 45035 DRL module (wire taps, harness, etc)
• 10 mm socket and wrench
• Extra wiring (if connecting to cabin)
• Soldering iron and solder (if not using wire taps)
• Screwdriver wrapped in tape (if connecting to center console)
• Bundle ties to secure wires
Procedure (1—2 hours)
I purchased the Hamsar 45035 (60% reduced high beam) kit from Terminal Supply (1-800-989-9632) for $43.00. Kit comes with module, mounting screws, harness and wire taps.
The directions first have you mount the module, but I connected the wiring first, so as to give me more room. I chose the driver’s side of the engine compartment on the fender wall.
(Note: this is for 2010 vehicles, so wire colors may vary)
First you want to connect the black (ground) wire to the ground point right next to the brake fluid reservoir. Use a 10mm socket to remove and replace.
Next, remove the cowl that connects to the battery case. This will allow you access to the lighting wiring. You will remove one plastic “screw.” Be careful not to strip the screw head!
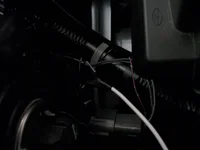
Connect the white wire to the gray wire on the high beam circuit (12V when high beams are on). You can use the wire taps; however, I soldered the connections because I couldn’t really reach in to squeeze the connection shut.
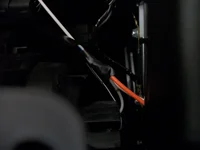
Connect the orange wire to the gray wire on the low beam circuit (12V when low beams are on).
The following wires will be connected to these sources:
Blue—12 V “ignition on,” 0V when engine cranked (not needed if green wire attached to power accessory wire)
Green—12V “ignition on”
Yellow—parking brake switch
My model is a 2010 and the wiring diagram for my model hasn’t been published yet, according to the dealer. Though the engine fuse block had several 12V “ignition on” sources, I could not find all three sources in the engine compartment, so I ran wiring to cabin. (You could connect the wires to the passenger fuse block as well, but the only fuse taps I found were for 10A max, and most 12V sources in the fuse panel are 15A. I didn’t want to compromise the fuse rating).
If you can find easier connections, please add them to the thread.
The green and yellow (blue wire if desired) wires will need to be run parallel to the wiring bundle at the bottom of the firewall into the passenger compartment. I use an old wire coat hanger to poke through the rubber and pull the wires through. The wires are not long enough, so you will need to connect other wires to these. Just remember which wire is which!
The green wire is connected to a 12V “ignition on” source. I chose to run wiring to the power accessory point in the front console. Use a screwdriver wrapped in tape to pry off the power accessory panel. Connect the green wire to the blue wire of the power accessory circuit (12V when ignition is on) If you connect here, the DRLs will go out when the engine is cranked and come back on when the engine has started. You will not need the blue wire from the DRL module. If you do not connect to the power accessory wire, you will need to connect the blue wire to the AUDIO fuse in the passenger block.
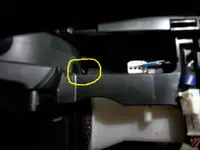
The yellow wire is connected to the brake switch, so the DRLs turn off when the parking brake is on. Connect the yellow wire to the tan/white parking brake switch wire. To reach this wire, pry out the cup holder panel. The parking brake switch wire is located closest to the front of the parking brake. Because this wire is further down in the console, you may need to loosen the two screws at the front of the center console panel to lift it up to reach the parking brake wire.
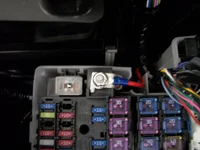
Finally, the red wire is connected to the engine compartment fuse block. Connect to the point where the battery cable connects to the fuse block. Use a 10mm socket to remove and replace.
Now is the time to mount the module. I mounted on inner driver’s firewall. Connect the harness to the module and test for proper operation.
Testing
Turn on all lights without turning on engine. All lights should operate normally (check high beams too). Turn engine on and DRLs should come on. Test low beam headlights and DRLs should go off. Turn off lights and apply parking brake—DRLs should go out. Turn off engine and DRLs should turn off immediately.
If testing works as it should, zip tie the yellow, green, and blue wires to the vehicle wiring harness and replace the cowl that connects to the battery case. Replace the power accessory and cup holder panels, and tighten any screws that were loosened. Use silicone to fill in the hole you made in the rubber grommet.
You now have DRLs. Should you ever want to disable the feature, disconnect the harness from the module.
Pictures
I had included pictures below, but had to attach them differently, so hopefully they work well. First one is where the red wire attaches. Second is the high beam connection, third is the low beam connection, fourth is where the parking brake is located.
Background
I love my Mazda 5, and find a great vehicle to drive. I had noticed that it didn’t come with the DRL feature as an option. With the Ford Escape we replaced, I was able to have the dealer reprogram the Smart Junction Box to turn on the DRLs. This is not the case with Mazdas, which necessitates the need for a DRL kit.
At first I thought I wanted the DRLs to be like OEM Canadian models (on the low beam) but that wouldn’t help those in the U.S. who have HIDs on the low beam, plus the low beams might burn out faster if they were the primary DRLs.
Secondly, I know that there are those out there that either like DRLs or don’t like them. This thread is not to debate the good or bad, but merely to offer an option of adding. The silver color of our 5 and the two lane roads we travel often was a consideration for me adding them. (On a side note, my insurance company offers a 15% discount for adding them)
Lastly, the following procedure worked on my vehicle; however, I make no guarantees that you will get the same results. I also cannot be responsible for any damages you may incur while installing, or after. I merely offer this thread to save others time who wish to add DRLs to a Mazda 5.
Materials
• Hamsar 45035 DRL module (wire taps, harness, etc)
• 10 mm socket and wrench
• Extra wiring (if connecting to cabin)
• Soldering iron and solder (if not using wire taps)
• Screwdriver wrapped in tape (if connecting to center console)
• Bundle ties to secure wires
Procedure (1—2 hours)
I purchased the Hamsar 45035 (60% reduced high beam) kit from Terminal Supply (1-800-989-9632) for $43.00. Kit comes with module, mounting screws, harness and wire taps.
The directions first have you mount the module, but I connected the wiring first, so as to give me more room. I chose the driver’s side of the engine compartment on the fender wall.
(Note: this is for 2010 vehicles, so wire colors may vary)
First you want to connect the black (ground) wire to the ground point right next to the brake fluid reservoir. Use a 10mm socket to remove and replace.
Next, remove the cowl that connects to the battery case. This will allow you access to the lighting wiring. You will remove one plastic “screw.” Be careful not to strip the screw head!
Connect the white wire to the gray wire on the high beam circuit (12V when high beams are on). You can use the wire taps; however, I soldered the connections because I couldn’t really reach in to squeeze the connection shut.
Connect the orange wire to the gray wire on the low beam circuit (12V when low beams are on).
The following wires will be connected to these sources:
Blue—12 V “ignition on,” 0V when engine cranked (not needed if green wire attached to power accessory wire)
Green—12V “ignition on”
Yellow—parking brake switch
My model is a 2010 and the wiring diagram for my model hasn’t been published yet, according to the dealer. Though the engine fuse block had several 12V “ignition on” sources, I could not find all three sources in the engine compartment, so I ran wiring to cabin. (You could connect the wires to the passenger fuse block as well, but the only fuse taps I found were for 10A max, and most 12V sources in the fuse panel are 15A. I didn’t want to compromise the fuse rating).
If you can find easier connections, please add them to the thread.
The green and yellow (blue wire if desired) wires will need to be run parallel to the wiring bundle at the bottom of the firewall into the passenger compartment. I use an old wire coat hanger to poke through the rubber and pull the wires through. The wires are not long enough, so you will need to connect other wires to these. Just remember which wire is which!
The green wire is connected to a 12V “ignition on” source. I chose to run wiring to the power accessory point in the front console. Use a screwdriver wrapped in tape to pry off the power accessory panel. Connect the green wire to the blue wire of the power accessory circuit (12V when ignition is on) If you connect here, the DRLs will go out when the engine is cranked and come back on when the engine has started. You will not need the blue wire from the DRL module. If you do not connect to the power accessory wire, you will need to connect the blue wire to the AUDIO fuse in the passenger block.
The yellow wire is connected to the brake switch, so the DRLs turn off when the parking brake is on. Connect the yellow wire to the tan/white parking brake switch wire. To reach this wire, pry out the cup holder panel. The parking brake switch wire is located closest to the front of the parking brake. Because this wire is further down in the console, you may need to loosen the two screws at the front of the center console panel to lift it up to reach the parking brake wire.
Finally, the red wire is connected to the engine compartment fuse block. Connect to the point where the battery cable connects to the fuse block. Use a 10mm socket to remove and replace.
Now is the time to mount the module. I mounted on inner driver’s firewall. Connect the harness to the module and test for proper operation.
Testing
Turn on all lights without turning on engine. All lights should operate normally (check high beams too). Turn engine on and DRLs should come on. Test low beam headlights and DRLs should go off. Turn off lights and apply parking brake—DRLs should go out. Turn off engine and DRLs should turn off immediately.
If testing works as it should, zip tie the yellow, green, and blue wires to the vehicle wiring harness and replace the cowl that connects to the battery case. Replace the power accessory and cup holder panels, and tighten any screws that were loosened. Use silicone to fill in the hole you made in the rubber grommet.
You now have DRLs. Should you ever want to disable the feature, disconnect the harness from the module.
Pictures
I had included pictures below, but had to attach them differently, so hopefully they work well. First one is where the red wire attaches. Second is the high beam connection, third is the low beam connection, fourth is where the parking brake is located.
Attachments
Last edited:
")

