I definitely agree that there is a ton of threads on the topic, but none of them were all that helpful to me when I was doing my swap last week. Thewrench wrote up an excellent post with diagrams to do MSP lights on a P5, and also included a diagram for those putting P5 lights on their MSP, but his post has been long gone and just says, "oops, where's waldo?" which wasn't really helpful at all. Luckily, someone saved the post into a PDF and njarmeka posted it in my thread so I was able to do the swap even with my limited electrical knowledge. Attached is the file from thewrench's post so all credit goes to him.
So to cover all the bases in regards to this swap, I'll add whatever I know about it while it's till fresh in my memory.
1. The headlights will physically swap right over. They fit, however they do differ slightly so your MSP bumper will sag just a hair under the headlights if you install P5 lights on it. I personally didn't have this issue on my MP3, but many MSP owners have.
2. The sedans use a single bulb for both highs and lows. It's a dual filament bulb so it serves both functions. That means that the sedans also have just one plug. The P5 on the other hand has separate bulbs, therefore separate plugs. If you want P5 lights on a sedan, you'll need to get a plug for the high beams that the P5 uses.
3. The wiring for putting P5 lights on a sedan is a piece of cake. The other way around is a bit more of a pain in the ass though. Since the OP requested the MSP to P5 swap, I'll only attach the wiring diagram from thewrench's post which indicates how to do that swap. If you want sedan lights on your P5, search my threads and you'll find the info in the general P5 section.
Anyway, here is a rough summary of the wiring.
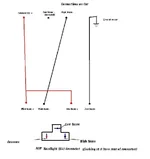
Your MSP will have three wires going to a single plug, which controls both highs and lows. The diagram attached will explain which wire controls what. When looking at it from the rear (the side which the wires come in), the left is the power wire, right is high ground, and top is low ground.
Then to wire the high beams, you'll want to take the top wire out of the plug (use a pick or tiny screwdriver from the front of the plug and the wire will pull right out), cut the connector off, and solder it to the high beam plug ground (-) wire. Then take the power (+) wire off the high beam plug and splice it into the power wire on the low beam plug. Use a test light to figure out which wire is power, and always solder the connections. Quick splices are unacceptable in my opinion. If you can't solder, learn.. it's super easy. YouTube has great beginner videos.
Now you will have both lows and highs, but if you leave them hooked up like this then the lows will shut off as soon as you turn on the highs. Which is not the way the P5 lights were designed to function. So to keep the lows on when you switch on the highs, you need to ground the lows to the chassis instead. Cut the ground wire going to the low beam plug, leave the connector in the socket, and run the wire to a constant ground. I used the ground strap that is located right under the headlights behind the fog light and just spliced in the wire into the thickest ground wire of the bunch.
And that will do it. You will now have fully functional P5 lights on your MSP or other sedan
")

 i think they should! yes/no?