2013~2016 CX-5 Strut and Shock replacement

Extremely happy camper. I took a ten mile spin to return those incompatible shock mounts. My CX-5 handles like new again. All of the subtle suspension issues are gone. No more roll on tight turns, no front end rise on acceleration, and no dip when braking. It tracks straight at 60+ mph without getting pushed by the wind again. It’s a much more confident ride. I imagine this is what it felt like when we drove it off the dealer lot.
 
Last edited:
Extremely happy camper. I took a ten mile spin to return those incompatible shock mounts. My CX-5 handles like new again. All of the subtle suspension issues are gone. No more roll on tight turns, no front end rise on acceleration, and no dip when braking. It tracks straight at 60+ mph without getting pushed by the wind again. It’s a much more confident ride. I imagine this is what it felt like when we drove it off the dealer lot.
Good for you with all 4 new shock absorbers installed and you like the new ride. I remember ColtX-5 said he felt KYB shocks are too soft for his taste. One of your rear shocks is bad at 84K miles, I guess I’d need to watch the rear shocks more often once my CX-5 has reached that kind of mileage.

BTW, you’re very efficient to the job you’ve done today. I imagine it’d take me the whole day to complete the same job! :rolleyes:

Thank you! I studied the instructions posted at mcx5 and watched FelixD’s YouTube video a couple of times. Chris_top_hers suggestion to do the rear links with the car on the ground was spot on. Having the right complement of tools was a must. 3 hrs total from start to finish. I’d be absolutely smoked right now if I didn’t have my 6 gallon air compressor and my trusty 20+ year old Ingersol Rand impact wrench :D

Jack and jack stands, did the rear shocks first and then the front struts last. I picked up a set of 1/2” drive metric impact sockets to complement my impact wrench. I always had a 21mm impact socket for lugnuts but that was it until this week. I remember needing a 12mm wrench, vice grips, along with 14, 17, 21 and 24mm deep sockets. The 24mm is optional I suppose, but I’ll tell you what it was just easier torquing the 24mm nut on the front steering knuckle vs the 21mm bolt depending on your angle of attack. The only “shallow” socket required would be a 14mm for the nut under the windshield cowl.

Torquing those front knuckle bolts was no joke either. The specs were like 160 something to 180 ft lbs. I cranked my torque wrench to the max 150 lbs and tightened until that clicked. Then I went back with my 1/2” drive breaker bar, stuck my jack handle on it as a cheater pipe, and tightened a little bit further. The rear was a little awkward on the drivers side and needed just over 120 ft lbs if I remember right. My wife had to push down on the assembly with her foot while I cranked upward as hard as I could. The rear passenger side was much easier. Spare jack stand under the rotor and crank downward. Phew!

As for soft vs hard, these are definitely an OEM feel for the ‘13 CX-5. I’d be wildly disappointed with them on an MX-5 lol! Coil overs might be your best bet if you’re seeking a firmer option.
 
My wife had to push down on the assembly with her foot while I cranked upward as hard as I could.

No wonder you’re so efficient! I wish I can have that “special tool” available to use ⋯

Thanks for all the tips! Sounds like the strut and shock absorber replacement on CX-5 is a little tougher than my 1998 Honda CR-V for the same job with those high-torque specs you mentioned. At least the rear ones on CX-5 are traditional type of shock absorber, not another strut setup like my CR-V.
 
Chris_top_hers suggestion to do the rear links with the car on the ground was spot on.
One question here. Since Mazda Workshop Manual doesn’t mention this replacing the rear shock absorbers, is removal of the rear stabilizer end-links necessary? And why?


Make sure the suspension is under normal load (not jacked up at all) when removing endlinks; they shouldn't be an issue.
 
One question here. Since Mazda Workshop Manual doesn’t mention this replacing the rear shock absorbers, is removal of the rear stabilizer end-links necessary? And why?
It also doesn’t mention removing the rear coils. If you trust your jack to hold the control arm in place while you remove and replace the shock, disconnecting the end links and removing the rear coils isn’t necessary. You’ll want to disconnect the end links if you want to lower the arm enough to remove the coil.

Another problem? There is no room to remove the bolt securing the lower part of the shock with an impact wrench without removing the coil. I disconnected the end links and removed the coils to get at that bolt with my impact wrench, as well as for safety purposes.
 
Last edited:
It also doesn’t mention removing the rear coils. If you trust your jack to hold the control arm in place while you remove and replace the shock, disconnecting the end links and removing the rear coils isn’t necessary. You’ll want to disconnect the end links if you want to lower the arm enough to remove the coil.

Another problem? There is no room to remove the bolt securing the lower part of the shock without removing the coil. I disconnected the end links and removed the coils to get at that bolt with my impact wrench, as well as for safety purposes.
OK, got it. You actually separated stabilizer end-link and lower control arm to remove the coil spring, then replaced the rear shock absorber. So the job is a bit more involved than the manual says. I guess this’s another example of a good theory on paper but it may not work in real life experience! Thanks for the explanation.
 
OK, got it. You actually separated stabilizer end-link and lower control arm to remove the coil spring, then replaced the rear shock absorber. So the job is a bit more involved than the manual says. I guess this’s another example of a good theory on paper but it may not work in real life experience! Thanks for the explanation.
Exactly, and no problem at all! I have no idea why the shop manual didn’t specify those two additional steps under the shock absorber removal/replacement procedure. I might have received a little surprise had I not watched FelixDs YouTube video LOL!
 
Exactly, and no problem at all! I have no idea why the shop manual didn’t specify those two additional steps under the shock absorber removal/replacement procedure. I might have received a little surprise had I not watched FelixDs YouTube video LOL!
Actually I forgot there’re a couple of design changes on rear shock absorbers on 5/13/13 and 11/03/2014. So the experience with your 2013 CX-5 could be different from my 2016 CX-5. Hopefully Chris_Top_Her is correct and separating LCA is not needed for me.

Rear shock removal question

C54E0531-AF8A-45B2-9B6B-69C77CDBD51C.gif
 
Actually I forgot there’re a couple of design changes on rear shock absorbers on 5/13/13 and 11/03/2014. So the experience with your 2013 CX-5 could be different from my 2016 CX-5. Hopefully Chris_Top_Her is correct and separating LCA is not needed for me.

Rear shock removal question

View attachment 228967

that would be fantastic. I’ll likely have to do this for the mother in laws ‘17 in several years. I’d prefer loosening the bottom strut mount with a plain ole’ wrench/cheater bar and leaving the coil in place as long as the shock slid out easily :D
 
that would be fantastic. I’ll likely have to do this for the mother in laws ‘17 in several years. I’d prefer loosening the bottom strut mount with a plain ole’ wrench/cheater bar and leaving the coil in place as long as the shock slid out easily :D
Do you have a nut or a bolt (② in the diagram shown) for bottom eyelet of the rear shock?
 
Yessir, $113 at Rockauto. I’ll have to send in my rebate for $25 for a full set of KYB shocks and struts too.

I marked around the 3 nuts at the top with a sharpie. There’s little (if any) play up there. They look pretty on point relative to the old nuts that were removed. Other than that, I don’t think there’s anything you can do to avoid an alignment.

I’ve honestly never had an alignment done on this car. The current set (Goodyear Assurance comfortred) have been wearing evenly over the last 50k miles and probably have another 15k in them (tops). Their wet performance leave a little to be desired. If they start wearing funny I’ll spring for a new set of tires and get an alignment done then :D
You need to have the alignment checked after major suspension work like you did
 
Excellent information in case I need to change mine.

I've changed a few sets of rear shocks. The worst was Saturn Vue because of all those stupid plastic rivets around the mounting point. Otherwise just unbolt the top and bottom and replace.

Ruthrj, are you suggesting if I can remove that bottom bolt without using an impact wrench I don't have to undo all of those 'links', etc. ?
 
Do you have a nut or a bolt (② in the diagram shown) for bottom eyelet of the rear shock?
A bolt for the bottom eyelet.
You need to have the alignment checked after major suspension work like you did
I just remembered I have a TireDisocunters a block from work. I’ll probably drop it off and get an alignment done since I can just walk to and from the shop. No logistical nightmare or scheduling to deal with.
Excellent information in case I need to change mine.

I've changed a few sets of rear shocks. The worst was Saturn Vue because of all those stupid plastic rivets around the mounting point. Otherwise just unbolt the top and bottom and replace.

Ruthrj, are you suggesting if I can remove that bottom bolt without using an impact wrench I don't have to undo all of those 'links', etc. ?
I think so. Chris_top_her suggests that too in the thread Yrwei linked above. You’ll want an extension for your wrench handle though to break that bolt loose. It’s on there with 120+ Ft lb of torque in a somewhat awkward position. Imagine trying to manually remove a lugnut that’s on too tight on the backside of the wheel.

When I looked at it in person I said screw it, I’ll do the extra couple steps to save myself that headache LOL. I didn’t care for how FelixDs mechanic used a jack stand under the control arm though. I felt much better using my floor jack to support and lower the control arm. It also was a cinch to lift back into place when reinstalling the coil.
 
Last edited:
A bolt for the bottom eyelet.
Thanks.
I just remembered I have a TireDisocunters a block from work. I’ll probably drop it off and get an alignment done since I can just walk to and from the shop. No logistical nightmare or scheduling to deal with.
I remember you mentioned you’ll need a set of new tires soon and you’ll do alignment job after that. I’d do the same and do the alignment after new tires installed.
 
Thanks.

I remember you mentioned you’ll need a set of new tires soon and you’ll do alignment job after that. I’d do the same and do the alignment after new tires installed.
It’s so borderline. I might be able to eek 18 months-2 years out of this set with my current driving habits if all goes well. I found a special on a 5 year alignment plan with the local shop, so that nudged me from leave it alone to get an alignment done. Then I’ll be able to do alignments with a current and new set of tires XD
 
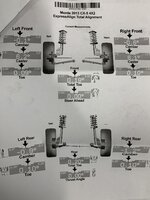
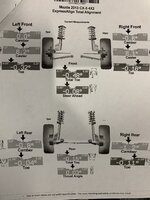
Post and pre alignment specs. Toe was way off on 3 of the 4 wheels, nearly out of spec for the last wheel. I’d like to think all of the suspension work caused that and not 8 years of no alignments lmbo. Tires have worn fine, car went straight, and gas mileage has been unchanged over the cars life. All in the green now!
 

Attachments

  • EE8AA367-9C50-42A7-A309-7F754834048C.jpeg
    EE8AA367-9C50-42A7-A309-7F754834048C.jpeg
    204 KB · Views: 209
  • CFFDCDF4-7E3D-4FCD-96FF-27E46AF0F5B1.jpeg
    CFFDCDF4-7E3D-4FCD-96FF-27E46AF0F5B1.jpeg
    202.4 KB · Views: 183
Post and pre alignment specs. Toe was way off on 3 of the 4 wheels, nearly out of spec for the last wheel. I’d like to think all of the suspension work caused that and not 8 years of no alignments lmbo. Tires have worn fine, car went straight, and gas mileage has been unchanged over the cars life. All in the green now!
I was expecting to see green and red colors, but your alignment before-after reports are black-and-white?! ;)

Not much the mechanic can do on casters and cambers and they’re all within specs. Good to have the alignment done it seems. (y)
 
I was expecting to see green and red colors, but your alignment before-after reports are black-and-white?! ;)

Not much the mechanic can do on casters and cambers and they’re all within specs. Good to have the alignment done it seems. (y)
You can’t see the colors?

Lol, jk XD I guess the place I went to couldn’t spring for a color printer!
 
Thanks for all the help ruthrj. My car as about 83k miles on it and the suspension has completely deteriorated in the last thousand miles.
I ordered the same parts from rockauto (had the best price) and will give it a go. For those interested, the PNs are:
KYB​
3440013 - rear struts (QTY 2)
KYB​
SR4563 - front quick strut (QTY 1)
KYB​
SR4564 - front quick strut (QTY 1)

Oddly enough, rockauto didnt list the quick struts for my 2016 but KYB website says they are compatible so I ordered anyways.
 
Back